
Automatic Dropshadow and Border on Mac OS X Screenshots
If you’re like me, you take lots of screenshots. I probably average 20 a day. Primarily I use CMD-SHIFT-4 and drag a box around what I want to capture. The result is exactly what I highlighted. Here’s an example:
That looks fine, except there’s nothing that really helps the image stand out. It’s not ready for blog posts, documentation, or wherever else you’d like to use an image. I’ve approached the problem a few different ways in the past, but I’ve finally settled on a Keyboard Maestro-based solution for “Automatic” processing of these screenshots. I also have created a “Drop shadow” Service so you can apply a dropshadow to any image by right-clicking and using the Services menu.
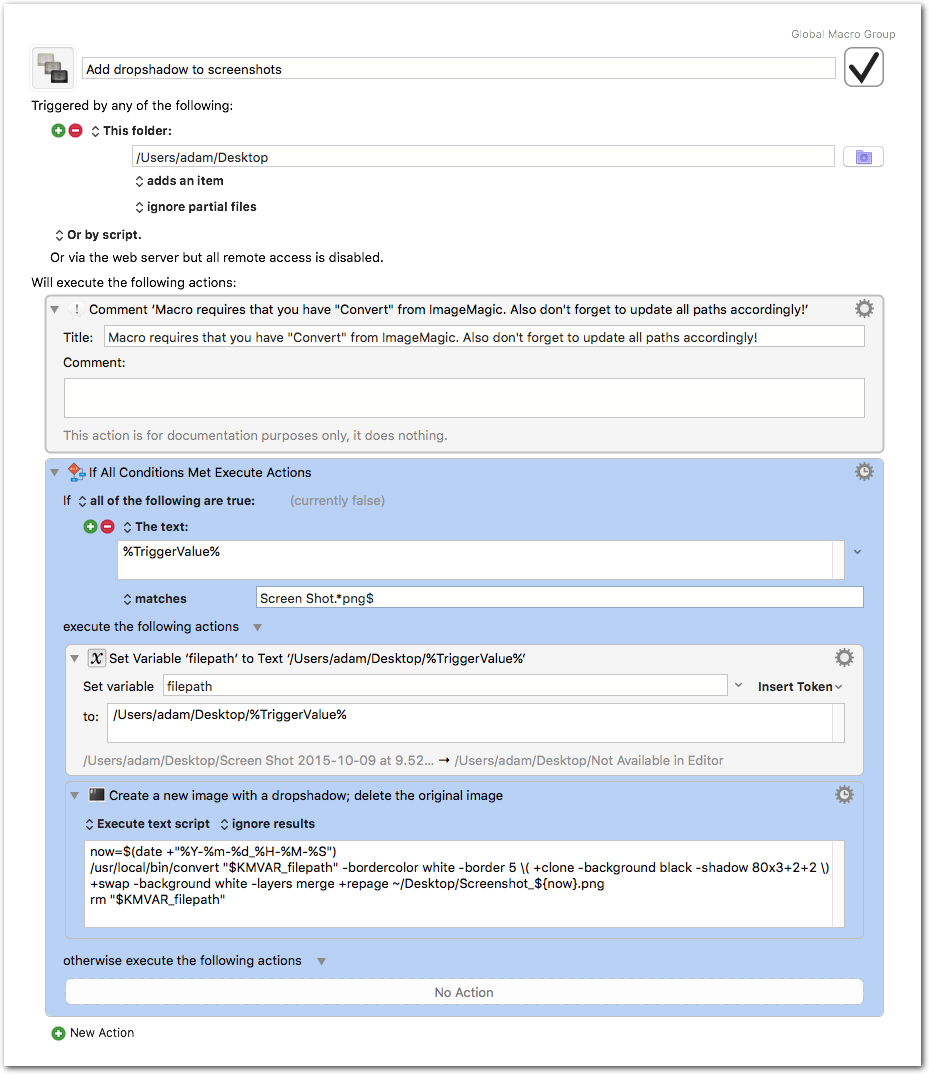
Basically I look for new files on the Desktop called “Screen Shot*.png” and use imagemagick convert to add a border and dropshadow. The new file is then saved to the Desktop using a slightly different name so that it’s not reprocessed. The original file is then deleted. Here’s the end result:
Isn’t that much better? The best part is that it happens automatically! I take a screenshot and by the time I check my desktop it’s already been processed.
You can also use similar code to add a “Drop shadow” item to the Services menu when you right click any image. This is great for those images you didn’t capture with the built-in screenshot tool.
You should update the paths used in the macro and the workflow to suit your needs.
Download Keyboard Maestro Macro | Download Service (Automator workflow)
2 Comments
Michiel Carpentier
Hi,
Thanks for this, it’s something I’ve been looking for for a while now! But I had trouble getting it to work – first getting ImageMagick installed properly (I’m not a Linux expert, but I finally managed). Then I could execute it in a terminal window but not from Keyboard Maestro or from AppleScript for that matter. But I got help at the KM Forum – the reason is the invocation of the Bash shell by KM in non-interactive mode which does not read $PATH etc. I have it working now, you can read all about it at https://forum.keyboardmaestro.com/t/shell-scripts-permissions-changed-with-el-capitan/3304/3
Thanks again –Mike
jtor
Hi,
Thanks for the service. It’s working flawlessly. However, I could not make the macro work on El Capitan. I’ve changed the path but seems to not detecting a file on my desktop.