-
Only Migrating Published Nodes in a D7 to D8 Migration
I’m not going into much detail here but hopefully this helps someone.
If you need to migrate only published nodes you can extend the d7_node plugin and add a condition to the query.
First, create a file in your module like /modules/custom/mysite_migrate/src/Plugin/migrate/source/MysiteNewsNode.php that extends the d7_node plugin:
-
Using GROUP_CONCAT to Combine Rows in a Drupal Query
Recently I was working on a D7 to D8 migration. I was trying to import news items and their taxonomy terms (among many other things). To make things simple I wanted the query results to have (for each node) a single field that contained a comma-separated list of taxonomy terms which I could then explode during the row processing. Using GROUP_CONCAT we can achieve this! Let’s break it down:
The Drupal 7 site has the following structure (focusing on the important bits for this blog post):
123-- News Item (news_item) <content type>---- Categories (field_categories) <field collection>------ Audience (field_term_audience) <taxonomy reference; unlimited values>The migration relies on the d7_node migrate source plugin, which basically queries for nodes of a specific type. The query object looks like this (simplified for this blog post):
-
User-chosen Field Output Styles in 5 minutes using Display Suite
I’m working on a site that has a “Statistics” paragraph bundle. The output looks like this:
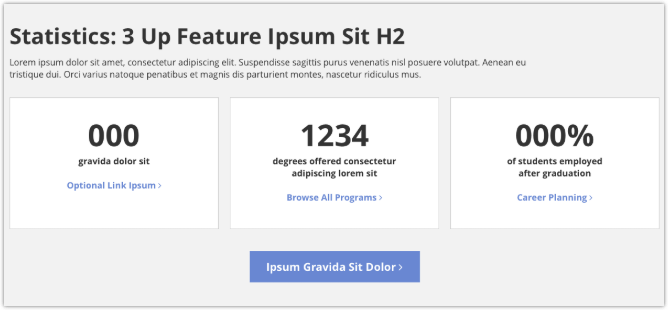
The specification calls for the content author to be able to choose between a few different visual styles for the header (title), shown as Statistics: 3 Up Feature Ipsum Sit H2 in the screenshot above.
The simplest way to achieve this is to add a field to the paragraph bundle:
123456789Name: Header StyleMachine name: field_header_styleType: List (text)Allowed number of values: 1Default value: Visually normalRequired: TRUEAllowed values:small|Visually smallnormal|Visually normalNote that the key (key|value) needs to work as a css class.
-
Adding Fields to Inline Entity Form Table
Inline Entity Form is a useful module for reference entities and being able to edit them in place.
Here’s what the edit form looks like out of the box for an unlimited value entity reference:
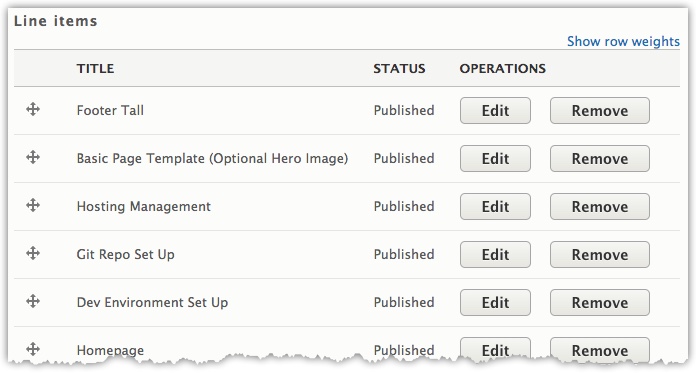
Often it’s helpful to provide additional information to your editors.
If you have a look at inline_entity_form.module you will find a function called theme_inline_entity_form_entity_table(). Within this you will see how this table is built, and how you can manipulate the form to add additional columns of information.
-
Automatically Put Files Into a YYYY/MM Directory Structure
123456789101112131415161718192021222324252627#!/usr/bin/env bash## This script will find .sql and .gz files in the current## directory and move them into YYYY/MM directories (created## automatically).BASE_DIR=$(pwd)## Find all .sql and .gz files in the current directoryfind "$BASE_DIR" -maxdepth 1 -type f -name "*.sql" -o -name "*.gz" |while IFS= read -r file; do## Get the file's modification yearyear=$(date -d "$(stat -c %y $file)" +%Y)## Get the file's modification monthmonth=$(date -d "$(stat -c %y $file)" +%m)## Create the YYYY/MM directories if they don't exist. The -p flag## makes 'mkdir' create the parent directories as needed so## you don't need to create $year explicitly.[[ ! -d "$BASE_DIR/$year/$month" ]] && mkdir -p "$BASE_DIR/$year/$month";## Move the filemv "$file" "$BASE_DIR/$year/$month"echo "$file" "$BASE_DIR/$year/$month"done -
Using PHPStorm for Git Diff and Merge tools (Mac)
You love git-difftool, right? Of course! You also love PHP Storm, right? Of course! This easy procedure lets you use PHP Storm as your git-difftool.
- Open a project in PHP Storm
- Click Tools » Create Command-line Launcher…
- Edit your ~/.gitconfig file:
-
12345678910[diff]tool = pstorm[difftool]prompt = false[difftool.pstorm]cmd = /usr/local/bin/pstorm diff "$LOCAL" "$REMOTE"[merge]tool = pstorm[mergetool.pstorm]cmd = /usr/local/bin/pstorm merge "$LOCAL" "$REMOTE" "$BASE" "$MERGED"
-
- Open the project in PHP Storm (see notes below)
- Open iTerm2 (or any other terminal emulator)
- Use
git difftoolas you normally would (e.g.,git difftool .htaccess)
Observations
- If you don’t have PHPStorm open when you try to use
git difftoolit doesn’t seem to work. I need to see if I can get it to open non PHP Storm projects, and/or I need to figure out how to switch on-the-fly between vimdiff and PHP Storm as my difftool. - If you have PHP Storm open but the project itself isn’t open, “Annotate” is not available on right-click. Other functionality may be missing too. If you project is already open in PHP Storm you can annotate the diff!
Thank you to JohnAlbin for the configuration snippet above.
-
Find and Open (in vim) Multiple Files
This is a quick set of examples for finding and opening multiple files in Vim.
1234567891011121314# Open all found files in vimdifffind . -name '.lando.yml' -exec vimdiff {} +# Open all found files, one-by-onefind . -name '.lando.yml' -exec vim {} \;# Open all found files in tabsfind . -name '.lando.yml' -exec vim -p {} +# Open all found files in vertical splitsfind . -name '.lando.yml' -exec vim -O {} +# Open all found files in horizontal splitsfind . -name '.lando.yml' -exec vim -o {} + -
Basic HTTP Authentication in Drupal Site Using settings.php
Here’s a quick and painless way of preventing public access to a Drupal site using settings.php (or settings.local.php).
I’ve been using this for development and staging sites that I want to keep private.
If you want this to be available to all settings*.php files you should put this near the top of your settings.php file:
123456789101112131415161718192021222324/*** Locks the site via basic http auth.** D7: if (!drupal_is_cli())* D8: if (PHP_SAPI !== 'cli')** @param array $users* Array of users e.g., ['user1' => 'pass1', 'user2' => 'pass2'].** @see https://agileadam.com/2018/04/basic-http-auth-drupal-site-using-settings-php/*/function lock_with_basicauth($users) {if (PHP_SAPI !== 'cli') {$valid_users = $users;$valid_usernames = array_keys($valid_users);$user = (!empty($_SERVER['PHP_AUTH_USER'])) ? $_SERVER['PHP_AUTH_USER'] : '';$pass = (!empty($_SERVER['PHP_AUTH_PW'])) ? $_SERVER['PHP_AUTH_PW'] : '';if (!((in_array($user, $valid_usernames)) && ($pass == $valid_users[$user]))) {header('WWW-Authenticate: Basic realm="Private Site"');header('HTTP/1.0 401 Unauthorized');die('Not authorized.');}}}Then, you can leverage it wherever you’d like. For example, on an Acquia site I might add this to the bottom of settings.php:
12345678910if (!empty($_ENV['AH_SITE_ENVIRONMENT'])) {switch ($_ENV['AH_SITE_ENVIRONMENT']) {case 'dev':lock_with_basicauth(['agileadam' => 'mysecretdevpass']);break;case 'test':lock_with_basicauth(['agileadam' => 'mysecretstagepass']);break;}}For non-Acquia sites I’d call the function at the bottom of settings.local.php.
-
Valet+ Quickstart for Drupal Development
Here’s a README.md file that I’ve developed over time. It explains how I setup and use Valet+ for quick and powerful Drupal development.
Sorry for the formatting. I’ll get markdown support on my blog sometime…
123456789101112131415161718192021222324252627282930313233343536373839404142434445464748495051525354555657585960616263646566676869707172737475767778798081828384858687888990919293949596979899100101102103104105106107108109110111112113114115116117118119120121122123124125126127128129130131132133134135136137138139140141142143144145146147148149150151152153154155156157158159160# Initial Valet SetupFollow official install guide at https://github.com/weprovide/valet-plus# InstallationThe following procedure is what it took to get Valet+ installed correctly on my Macbook.I had issues with MySQL not starting.# Install Valetbrew updatebrew tap henkrehorst/phpbrew install valet-php@7.2brew install composerbrew link --overwrite composerbrew install php@7.1composer global require weprovide/valet-plusvim ~/.bash_profilevalet fixvalet install# Link an appcd ~/valet/mysite/docroot/valet link mysitevalet restart# Create a databasevalet db create mysite(COMMAND FAILED; MYSQL NOT RUNNING?)valet stop# Fix MySQLbrew uninstall mysqlbrew uninstall mysql@5.7brew cleanuprm -rf /usr/local/var/mysqlrm /usr/local/etc/my.cnfbrew install mysql@5.7brew link --force mysql@5.7brew services start mysql@5.7valet fixvalet install# Create a databasevalet startvalet db create mysite# SUCCESS!----Tips:- Make a folder to store your sites `mkdir ~/valet`- Do not `valet park`. See notes below.# Site Setup (serving from ~/valet/[sitename]/docroot)1. Create site directory via `mkdir ~/valet/mysite`2. Move into it via `cd mysite`3. Use rsync/git/composer/whatever to acquire your site files --e.g., `git clone git@bitbucket.org:mysite.git .`4. Move into docroot via `cd docroot`5. Tell valet to serve a site from this folder via `valet link mysite`6. Browse to `http://mysite.test` -- if you get a DB error, that's okay for now.7. Create a new database via `valet db create mysite`. If this fails, see top of this doc!8. Existing site? Import the data with `valet db import ~/db_snapshots/mysite.sql.gz mysite`9. Update the db credentials in `sites/default/settings.local.php` -- database=mysite,username=root, password=root10. Browse to `http://mysite.test` -- hopefully it _just works_----# Explanation of Serving Sites from Docroot/Web SubdirectoriesDon't `valet park` in this `~/valet` directory. You can do itsomewhere else if you need auto-folder-to-domain functionalitywhere you create a folder and it results in having`http://folder.test` available immediately.For this `~/valet` directory we have sites that have `/docroot`subdirectories containing the actual site files, so instead of `park`,use `valet link [sitename]` from the docroot directory. This willcreate symlinks in `~/.valet/Sites` which will be accessibleat `http://sitename.test`----# Other Tips- RTFM! Valet does some amazing things. Read the docs to learn about xdebug, loggingsharing, redis, mailhog, etc.- `valet links` to view current links- `valet unlink [sitename]` to remove a link- `valet use 5.6` to change php version (5.6 7.0 7.1 7.2)- Edit `~/.valet/config.json` to set domain suffix (`.test` is default)(`valet restart` after)- Edit `~/.valet/Drivers/` to setup new drivers (shouldn't need to)(`valet restart` after maybe?)- `valet share` to share your site over the internetHit CTRL-C to stop sharing- You may not have a `$_SERVER['DOCUMENT_ROOT']` value. Until I have time to lookinto this, I'm just setting that at the top of my Drupal `settings.local.php` file.```// Manually set because Valet+ doesn't, for some reason$_SERVER['DOCUMENT_ROOT'] = '/Users/adam/valet/mysite/docroot';```- Install and enable memcached with:`brew install php71-memcached && valet restart`- Configure php with ini files at, for example, `/usr/local/etc/php/7.1/php.ini`- To generate nginx file specific to site you can:- Generate config file by securing the site: `valet secure mysite`- Copy the nginx config code in the resulting nginx file at `~/.valet/Nginx/mysite.test`- Stop here if you want to keep SSL... otherwise:- Use `valet unsecure mysite` to remove SSL (if you don't want the site served over 443)- Re-create `~/.valet/Nginx/mysite.test` with the copied code- Rework config file to serve port 80 without any SSL certs attached- To fix `upstream sent too big header while reading response header from upstream` error:- Add these lines to your `~/.valet/Nginx/mysite.test`:- `fastcgi_buffers 16 16k;`- `fastcgi_buffer_size 32k;`- NOTE: Add these to the `location ~ \.php$ {` section if you have a full nginx conf file- To fix `504 Gateway Timeout` error:- Add these lines to your `~/.valet/Nginx/mysite.test`:- `fastcgi_buffers 16 16k;`- `fastcgi_buffer_size 32k;`- `fastcgi_read_timeout 180;`- NOTE: Add these to the `location ~ \.php$ {` section if you have a full nginx conf file----# LinksValet+ Docshttps://github.com/weprovide/valet-plusParking and Linkinghttps://laravel.com/docs/5.5/valet#serving-sites