-
Mac High CPU Usage – WindowServer
DISCLAIMER: I’m writing about my personal experience here. I am by no means doing some exhaustive investigation. The changes I explain below seem to make a difference, at least according to what Activity Monitor is showing for CPU usage.
My laptop (3.1GHz i7 MacBook Pro with 16GB of RAM) has enough of power, so why has it been such a dog since starting from scratch with a fresh OS? A colleague posted an animated Gif today in Slack and my MacBook fans kicked in and it sounded like it was getting ready to fly away. This was the last straw in what has been weeks of wondering why my laptop has been slow.
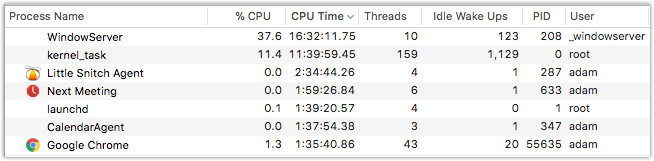
I opened Activity Monitor and found that my WindowServer process was using a significant amount of CPU resources (up to 77% when the animated gif was visible on my screen), and that it has used significantly more than the next heaviest process since I last rebooted.
I understand that it’s probably a pretty heavy process, but it got me thinking, and Googling. As it turns out, when something is being drawn to the screen it takes processing power; go figure! One of the top suggestions was removing or disabling things from the menu bar that are constantly updating. The suggestions included CrashPlan and Little Snitch Network Monitor. Wow. I use the latter! I opened the Little Snitch preferences and unchecked “Show network activity in menu bar” and voila! the WindowServer process memory dropped about 15%. Then I closed the animated gif my colleague posted in Slack (the only other thing on the screen that was moving) and voila! it dropped again.
Now, as I’m looking at my CPU Time in Activity Monitor I’m thinking through what I really need running. Is the “Next Meeting” (which shows the name and time of my next meeting in the menu bar) application really worth running 24/7? I don’t think so; especially if I have more important things for my CPU to be doing. After quitting this application my WindowServer CPU usage dropped to 6.6%.
I’m going to continue to trim the fat to see how lean I can make my machine. Obviously it doesn’t stop at just trimming out running applications, but I’m blown away by the impact of small changes like these.
-
Python Faker with the Fake App (Mac OS)
Fake App is a fantastic way to automate form filling, especially for folks without coding skills. The click-and-drag to target an element lets you quickly build your macros.
Python Faker is a utility library that I leverage with tools like Fake App, Alfred, Keyboard Maestro, etc. to generate realistic dummy text. This blog post shows one method of how to get Python Faker data into Fake App; I imagine there might be a simpler way but this works well and is fairly intuitive.
The idea is to just write the Faker output to a file and read that file into a variable for use in Faker. With this method you could even store variables for re-use. For example, if you had three fields: First Name, Last Name, and Full Name, you could easily store the first and last names to separate files and use both values for the Full Name field. With the power of Faker your dummy text options are extensive; you can generate very realistic values for your form filling. See all of the “providers” here.
This example below took just minutes to setup (and it was the first time I’ve used this technique).
-
Bookmark with Dynamic Components via Keyboard Maestro (with Toggl Reports example)
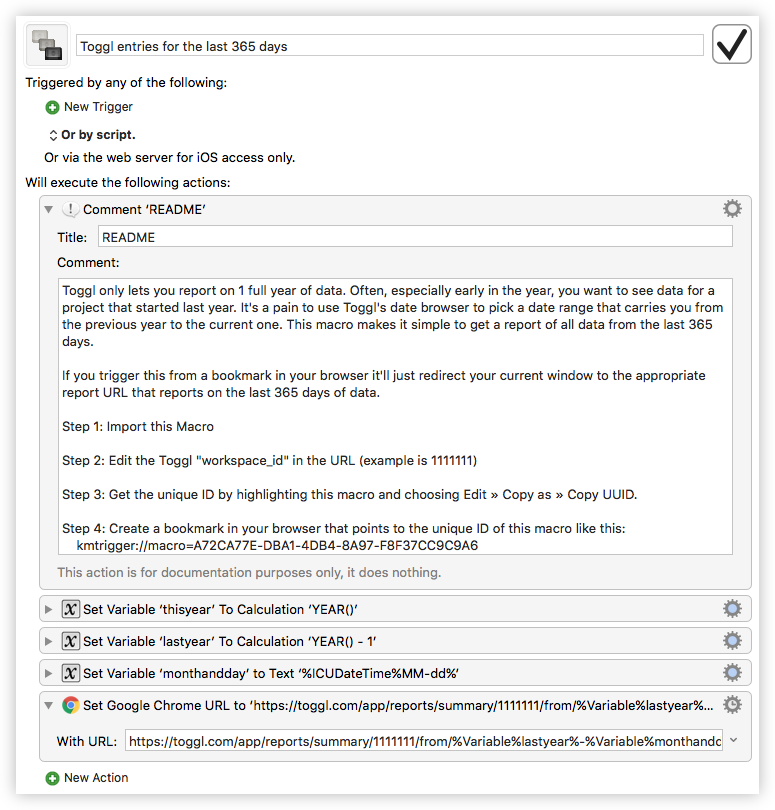
Here’s an example of how you can use Keyboard Maestro to create bookmarks that use dynamic components. For this example I wanted to create a bookmark that would give me the correct URL to get a report of the last 365 days of Toggl time entries. Toggl lets you pass a start date and an end date in the URL. Using KM it’s easy to replace those values with calculated date values.
Click the screenshot at the right to see the macro, which I’ve also provided here: Toggl entries for the last 365 days.kmmacros.
-
Adding Entity Wrapper Class from Field Value using Display Suite
NOTICE: This works fine in Drupal 7. For Drupal 8 please note: https://www.drupal.org/node/2863420
This may not work with paragraph bundles (because you don’t have a Token view mode). Maybe there’s a way, but I don’t have time to mess with it.
Sometimes as a developer you need to provide your Drupal authors with the ability to choose different variations of a particular content object. For example, imagine you have a Callout paragraph bundle and you want the author to choose between a Dark or a Light colorscheme; if the user chooses Light, the font colors appear dark over a light background. To achieve this you need a dark or light class on the entity wrapper based on whichever the author chose; this would let you write CSS to target each color scheme. Using Display Suite this is an easy problem to solve and doesn’t require any preprocess code or other hand-coded solution.
This solution requires Token and Display Suite. You will need to enable the ui modules from these, as well as ds_extras to give you the CSS class functionality.
-
Backing up a File Before Overwriting It (in Drupal 7)
I’m communicating with a 3rd party SOAP API to pull some data into a CSV file. The CSV file will be used by Feeds and/or Migrate so it’s important to have the file named exactly the same for each run. I want the generated CSV to always be named “mdb_interests.csv” but I want to “backup” the existing “mdb_interests.csv” to “mdb_interests_N.csv” if one already exists. This will ensure that we always have the latest data in “mdb_interests.csv” but will have backups from all previous API pulls. Using some built-in Drupal functions it’s pretty simple:
-
Triggers in iTerm – Watching For Specific Strings
I was recently performing a git-add in patch mode ( git add -p ) as I normally do, and realized there were a few lines I needed to make sure I didn’t commit. These lines were sandwiched between other lines that I did want to commit, and there were hundreds of changes, so it was hard to spot them. I wondered if iTerm2 had a way of highlighting or alerting when a specific word shows up in the terminal. To my surprise I found a “Triggers” section under the “Profiles » Advanced” tab in the settings for the app. iTerm2 really can do everything!
-
Microphone Enable/Disable with Alert – Keyboard Maestro Macro
In the past I’ve used Shush to achieve a push-to-talk or push-to-silence setup on my Mac. It works alright but more often than not I forget which mode I’m in, or whether I’m silenced or not. This leads to awkward moments in meetings.
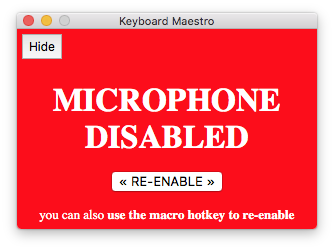
I’ve solved the problem using Keyboard Maestro. This macro, triggered via CTRL-m simple enables or disables the current “input” device (whatever is selected in the Sound preferences) by setting its level to 0 or 100. It’s a toggling macro so you can use the same hotkey to flip between the two states. Most importantly, though, is the nice popup alert that appears when you go into “disabled” mic mode. This window is hide-able if it gets in the way, and it also disappears if you re-enable (via hotkey OR the RE-ENABLE button). You can safely disable the “Custom HTML Prompt” action if you don’t want to see the prompt. Here’s what the popup looks like:
-
Random Mouse Distance in Keyboard Maestro
Here’s one way to choose a random item in a select list using just mouse movements and a random number. If you’re trying to do this in a browser there are cleaner ways to do it (javascript, chrome/safari actions, etc.), but for general usage across many applications this is a pretty universal solution.

I was surprised to find that you can type variables into the tiny coordinate text fields. They get bigger when you do.
When executed, this will select a random item (excluding “- None -“) from the select list.
-
Use Keyboard Maestro to Hide Instead of Close an Application
I use SnagIt to capture screenshots. The editor window that appears after you capture takes a few seconds to open if the application isn’t running. I realized that, while the capture tools remain open, the editor goes away when I hit ⌘W to close the window. Instead of using ⌘W to close the editor window, I sometimes remember to use ⌘H to hide the window, which hides the window but leaves the application open. The editor window pops open much quicker if the application is still open.
Using Keyboard Maestro I’m able to intercept the ⌘W that I do all the time (muscle memory), and turn that into a ⌘H.
-
Launch Center Pro actions for Day One
Here are my Launch Center Pro actions for the Day One app on iOS. I’m not here to teach you how to use Launch Center Pro (a huge topic), so if you need to learn that I suggest a lot of Googling and perhaps a visit to their official documentation and FAQs. Basically LCP will step you through prompts as it builds the output to move into a new Day One journal entry. Day One supports markdown, so you can make entries that look nice, like this:
Use this LCPEncoder to convert the templates you see below into URLs. After you generate the URL, get it into the “url” field of the LCP action.