-
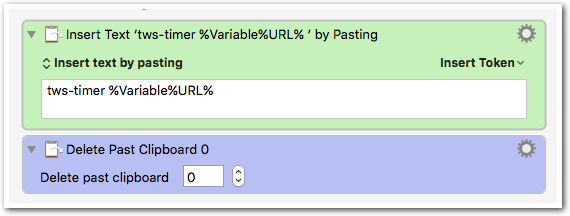
Keyboard Maestro “Insert text by pasting” Quick Tip
“Insert text by pasting” is faster than “Insert text by typing” (which is rarely necessary in my experience).
Unfortunately, using the paste method results in unwanted junk in your clipboard (unless of course this is also your intention). You can insert by pasting without having it store the text into your clipboard by adding a “Delete Past Clipboard” action just after the insert. Despite the name of the action, this will only remove the last item from your clipboard (not the entire contents of the clipboard).
-
Automatic Dropshadow and Border on Mac OS X Screenshots
If you’re like me, you take lots of screenshots. I probably average 20 a day. Primarily I use CMD-SHIFT-4 and drag a box around what I want to capture. The result is exactly what I highlighted. Here’s an example:
That looks fine, except there’s nothing that really helps the image stand out. It’s not ready for blog posts, documentation, or wherever else you’d like to use an image. I’ve approached the problem a few different ways in the past, but I’ve finally settled on a Keyboard Maestro-based solution for “Automatic” processing of these screenshots. I also have created a “Drop shadow” Service so you can apply a dropshadow to any image by right-clicking and using the Services menu.
-
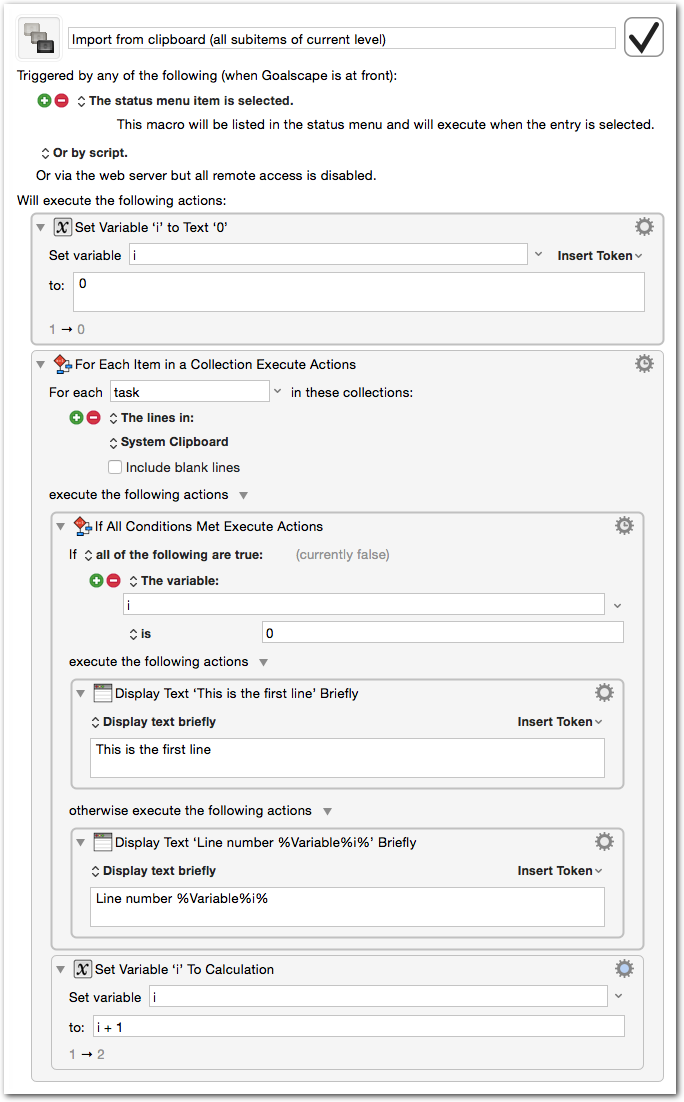
Keyboard Maestro – Looping Through Each Line of the Clipboard
This graphic illustrates how you can loop through each line of the clipboard and use the line’s value for some purpose. It also demonstrates how to handle the first line differently than the others.
This is zero-based. The second time through the loop will say “Line number 1” if you use the exact setup below. If you need your i variable to be “1” on the first loop, just move the i + 1 calculation above the If All Conditions Met Execute Actions and change the i is 0 to i is 1. Alternatively you could start i as 1 and change the i is 0 to i is 1.
-
Detecting When You’re “Away” or “Back” in Your Keyboard Maestro Macros
Your Mac knows the last time you moved the mouse or pressed a keyboard key. We can use this information in Keyboard Maestro to perform actions based on whether we’ve “gone away” from or have “come back” to our computer. I’m using this technique to set my status in Slack to “Away” if I step away from my computer for more than 10 minutes, and back to “Active” when I return. Here are a few quick examples that could use this same basic framework:
- Automatically pause music if I step away
- Show me a “Welcome back!” message when I return
- Write the date/time to a log file the when I go away and when I return
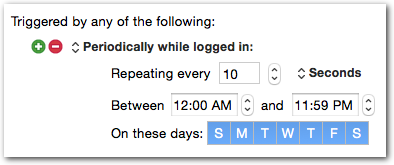
Setup your macro with a “Periodically while logged in” trigger. In the example here I’m using 10 seconds because I want no more than 10 seconds to pass before my system detects that I’ve returned to my desk. The macro isn’t very CPU-hungry so 10 seconds shouldn’t be problematic.
-
Easy Dummy Text using Python Faker and Keyboard Maestro
Yet again I’ve found a great use for Keyboard Maestro. I’m a web developer and often have to create “filler” or “dummy” text during development. In the past I’ve used Alfred workflows, copy-and-paste, browser extensions, and more. I’ve recently come up with a much cleaner (and more powerful) solution to achieving field-by-field or one-off dummy text.
What do I mean by field-by-field and one-off? Well, I use tools sometimes to automate filling an entire form repeatedly (Fake, Selenium, iMacros, etc.). I’ve even written a Selenium extension to inject random text into the fields Selenium is automatically filling. Unfortunately, this all takes time. Sometimes I just need to fill some fields in a form a few times and move on. It’s not worth automating at that point. Enter Keyboard Maestro.
-
Keyboard Maestro URL Handler (KMLink) – Introduction and Basic Usage
Keyboard Maestro offers many ways to trigger macros, but unfortunately there isn’t a URL handler that lets you trigger macros via a URL. There are a number of keyboardmaestro:// URLs handled by the built-in url scheme, but executing a macro isn’t an option. If you’re interested in triggering macros via bookmarklets and Finder shortcuts, read on…
I’ve written a URL handler that allows you to execute macros and pass variables to them. It’s a simple app that registers a URL handler to process kmlink:// links.
-
Trigger a Keyboard Maestro Macro with a Finder Shortcut / Icon
Using the Keyboard Maestro URL Handler (KMLink), you can create clickable shortcuts that you can use in Finder to trigger KM macros. Why would this be helpful? I have a macro that synchronizes my tracked time between two different applications. I wanted to trigger this with a simple mouse click, but didn’t want to tie it to a hotkey. I wanted it to feel more like “running an application.” So, I created the shortcut and moved it into my ~/Documents directory. Then, I right-clicked and chose “Get Info” and gave it a nice icon. Lastly, I dragged the item into my dock. Now I have a really nice icon that I can click whenever I want to sync my time.
-
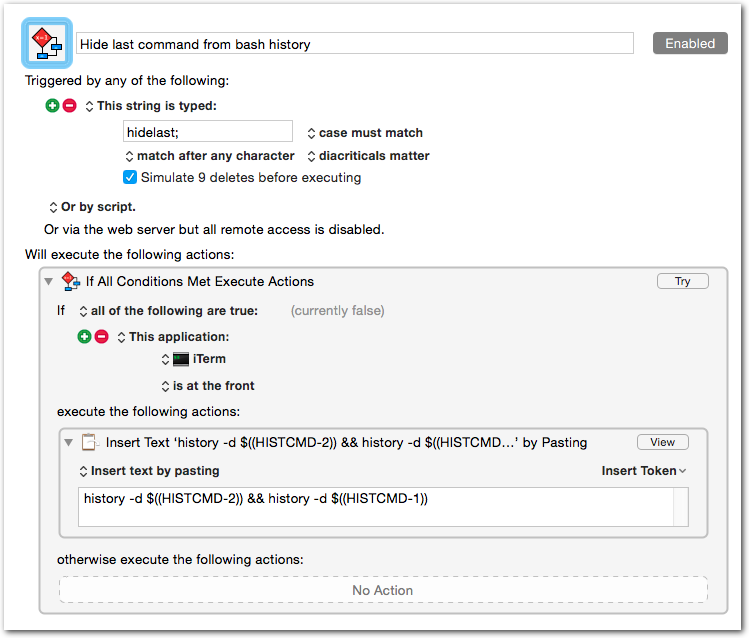
Delete Last Command from Bash History
If you’re like me, on occasion you accidentally (or sometimes purposefully) include a password in a command. Until recently I would execute history , find the offending command’s number, then do a history -d NUMBER . It is kind of a pain.
The following deletes the last item in your bash history:
1history -d $((HISTCMD-2)) && history -d $((HISTCMD-1))You can create an alias for this, type it manually (umm, no thanks), or, as is the case for me, create a Keyboard Maestro macro for it. Here’s what my macro looks like:
-
“Create Evernote Note” from Chrome Tab using Keyboard Maestro
Here’s an example of a macro that creates an Evernote note out of the current Chrome browser tab. My goal was to just throw the current page into Evernote with its page title as the note title, and its URL as the source URL.
Step 1: Build the macro as shown below. I encourage you to tweak the Applescript, but you may want to test with the Applescript editor first.
-
Keyboard Maestro URL Handler – Link Injection
Introduction
This post outlines some advanced usage of the Keyboard Maestro URL handler (KMLink).
A few weeks ago I was automating some Chrome form filling with Keyboard Maestro. It occurred to me that the perfect trigger for what I was doing would actually be a simple link within the Chrome webpage itself (or a simple bookmarklet); when the link/bookmarklet is clicked, the KM macro is executed. How about a little backstory before I get to the “here’s how to do it!” ?
We use a project management system called ActiveCollab. It’s a great piece of web-based software, but often simple things take several steps. When I want to quickly mark a task as “Due in 2 business days” (which I need to do very often) it’d be whole lot nicer to click a link to set this, than to have to go to the edit screen, pull up the date picker, think about what two business days from today is, click that date and submit the form. Sure, I could write a module for Active Collab that would do what I want, but Keyboard Maestro provides me with much more freedom and I can build it in minutes instead of hours.