DIY Panoramic Tripod Head
Introduction
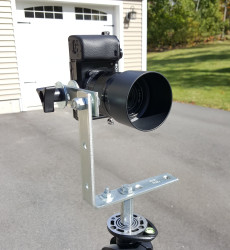
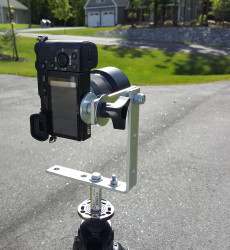
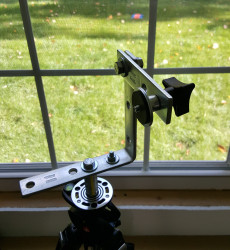
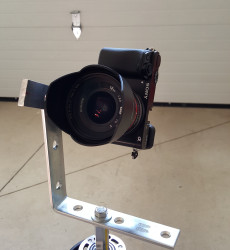
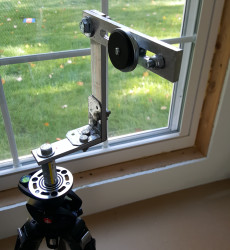
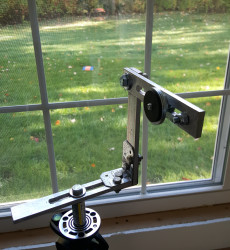
You’re here because you want to take great panoramic shots, and you’re amazed by how expensive the off-the-shelf panoramic tripod heads cost, right? The key to a good panorama is to have your camera mounted such that the no-parallax point of your lens doesn’t move when you rotate the camera about any axis. This device achieves this with simple parts you can purchase at the hardware store. First, let me show you the end result:
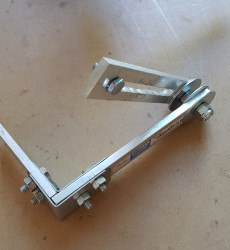
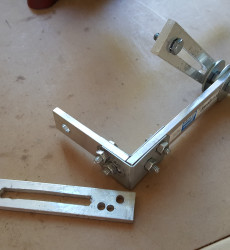
There are a few ways to build something like this. Originally I started with a design that was too complicated. I tried to have slotted brackets so that one head could work for any of my body+lens combinations. This proved to be very difficult and it looked pathetic (see bottom for photos). The cleanest solution I have come up with is to use a dedicated head with fixed-position holes for each body+lens combination. I really only use one lens for panoramas, so that was easy. This eliminates the need to mess with the rig when I want to shoot. I just mount the camera and go. No adjusting!
Parts
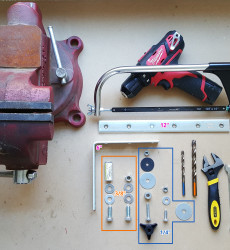
All of these parts (not these particular tools, though) can be purchased at Tractor Supply. I’m sure you can find most of them at any hardware store. You’ll need two good drill bits that can drill through the steel brackets (I attempted to build this with aluminum but the quality wasn’t great. The steel, when filed on the edges, looks and feels excellent).
Drawings
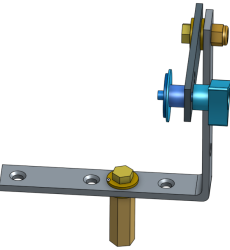
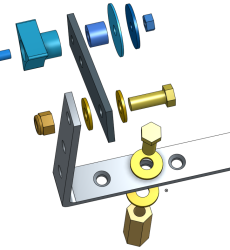
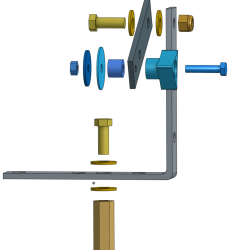
BLUE parts are 1/4 inch
YELLOW parts are 3/8 inch
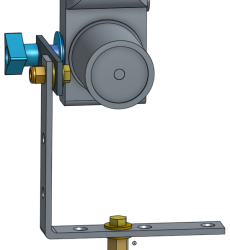
After several rounds of hands-on tinkering I decided to draw the device in OnShape. These should show, very clearly, how the device is assembled.
How to Build It
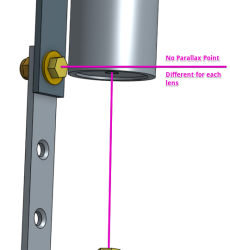
The key to building this correctly is to make sure your lens ends up in the desired position. You should know where the no-parallax point of your lens is prior to building this panoramic mount.
Buy the Hardware
The first step is to purchase all of the hardware. You may have to head back to the hardware store a few times before you get this thing finished, but you should be able to pick up most things (correctly) on your first trip. DISCLAIMER: Your camera may require you to use more or less (or even different thickness) spacers, washers, and bolts. Also, keep your receipts so you can return unneeded parts.
Position Camera on Straight Bracket
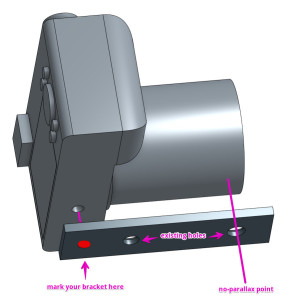
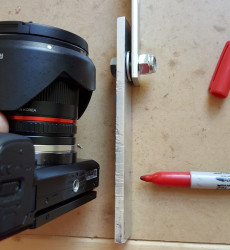
Now that you have your hardware, the first (and perhaps most important) step is to get your camera positioned on the straight bracket such that your no-parallax point lines up with the pivot point of the arm. To do this, place the straight bracket on the table, line up the no-parallax point of your lens with the last hole in the bracket. Now use a marker to place a mark on the bracket where the camera mounting bolt would go. Set your camera aside, drill on your mark with a 1/4″ drill bit (this needs to be centered between the long edges, of course). Drill out the no-parallax hole (at the end of the bracket) with a 3/8″ drill bit (it’s very close to 3/8 already, but you will need to open it up to a full 3/8).
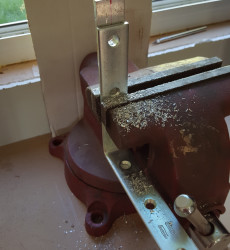
After you’ve created your 1/4″ camera mounting hole, you need to use a hacksaw to trim off the rest of the bracket. Using the image to the right as a reference (where camera hole is on left, no-parallax hole is on the right), cut the bracket off about 1/2″ to the left of the new 1/4″ hole. The end result will be a bracket that is just long enough to accommodate the camera and lens (up to its no-parallax point).
Mount the Camera and Adjust for Proper Spacing
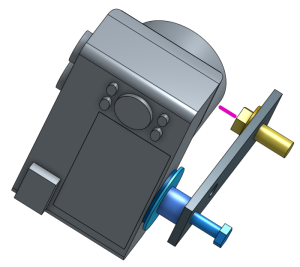
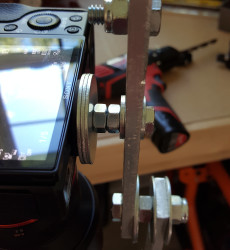
Before you can attach this camera bracket to the L bracket, you must get the camera mounted on its bracket. First, place a 3/8″ bolt into the no-parallax hole of the bracket. Don’t forget the metal washer. You can lock this bolt down with a nut to hold it in place. The head of this bolt will be facing the camera lens.
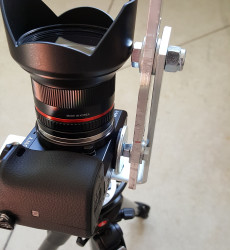
If you [ever] plan to use a lens hood, you must put that on now. Next, mount the camera to the bracket using the spacer, metal washer, rubber washer, and 1/4″ bolt. Add as many washers or spacers as you need to have proper clearance between the lens and the 3/8″ no-parallax bolt. You will probably want to put on the knob while you work on this too, I’ve just left it out of the picture. Refer to the diagrams above. You are finished this step when you have the camera mounted tight to the bracket and it (or its hood) is not rubbing against the head of the 3/8″ no-parallax bolt.
During this step you may want to take your camera and your current hardware to the hardware store. It was nice to be able to try things out and get the parts I needed without having to keep guessing. The parts I’ve show throughout this guide are exactly what I needed for my setup. Hopefully your needs will be similar.
Fasten Straight Bracket to L Bracket
You are now ready to fasten the straight bracket to the L bracket. This isn’t a permanent step, but it will give us the measurement we need to put the tripod mount hole into the L bracket.
Run your 3/8″ drill bit through the last hole of one side of the L bracket, then use the exploded parts diagram to figure out how to connect the camera straight bracket to the L bracket.
Drill the Tripod Mount Hole
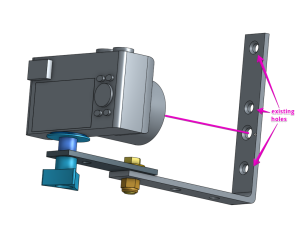
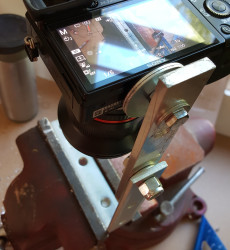
Now that your camera is mounted to the L bracket, swing the arm so the camera is pointing straight down at the L bracket. Turn your camera on and look through the viewfinder to determine where the center point is on the L bracket. My camera has a nice crosshair overlay that I could use to get the exact center, which made this easy. Use a marker to place a dot on the center.
Next, remove the camera from the straight bracket (or remove the whole assembly from the L bracket). Then, drill out the hole with your 3/8″ drill bit.
Important: If the center of your lens happens to fall partially over a hole you’re going to have to either increase or decrease the distance between the bottom of your camera and the straight bracket. The goal is to either have the center perfectly over an existing hole, or to drill a fresh hole without interference from the existing holes.
Assemble
At this point you can put together the final product. The exploded diagram shows how I mount the L bracket to my tripod, so have a look at that now. Don’t over-tighten the 3/8″ bolt holding the L bracket to the 3/8″ coupler. The way this design works requires that you leave enough play there to be able to spin the L bracket around (and that’s why we use washers between the bolt and the L bracket, and the coupler and the L bracket).
Finishing Touches
The edges of my brackets were a little rough. I used a file to smooth all of the edges. It gave the final product a nice finished look and feel.
How Do I Use It?
Well, you’ve done all of the hard work. When it comes to using it you’ll have to figure out your preferred way of doing things. I typically rotate the camera in a clockwise direction (so that I’m never loosening the tripod mount bolt). I start on the horizon and go 360 degrees, overlapping about 33% of each shot.
Next, I tip the camera upward so I’m barely capturing the ground. I rotate another 360 degrees, taking a shot with about 33% overlap.
Next, I tip the camera downward so the top of the frame captures just below the horizon. Repeat the 360 degree picture-taking.
This is a sad animation, I know. Just imagine the tripod coupler is staying in one place.
Final Thoughts
Your mileage may vary, but I hope this has helped give you some ideas! I highly recommend Hugin to process your photos. It does a great job and other software can be quite expensive.

One Comment
Clay Mills
Nice. I’m making one and will save $. Thx!