
Tideways and Xhgui using DevDesktop and Docker
THIS POST IS UNFINISHED. Use at your own risk. I needed to share with a colleague, so I’m just getting it out into the world. Your Mileage May Vary!
I’ve been working on some large Drupal 8 migrations and have been wanting to profile them for some time due to a few migrations taking far more time than I expected. Acquia DevDesktop, which I happen to be using for this site, offers xhprof in the older PHP environments, but I wanted to get something setup in PHP 7.
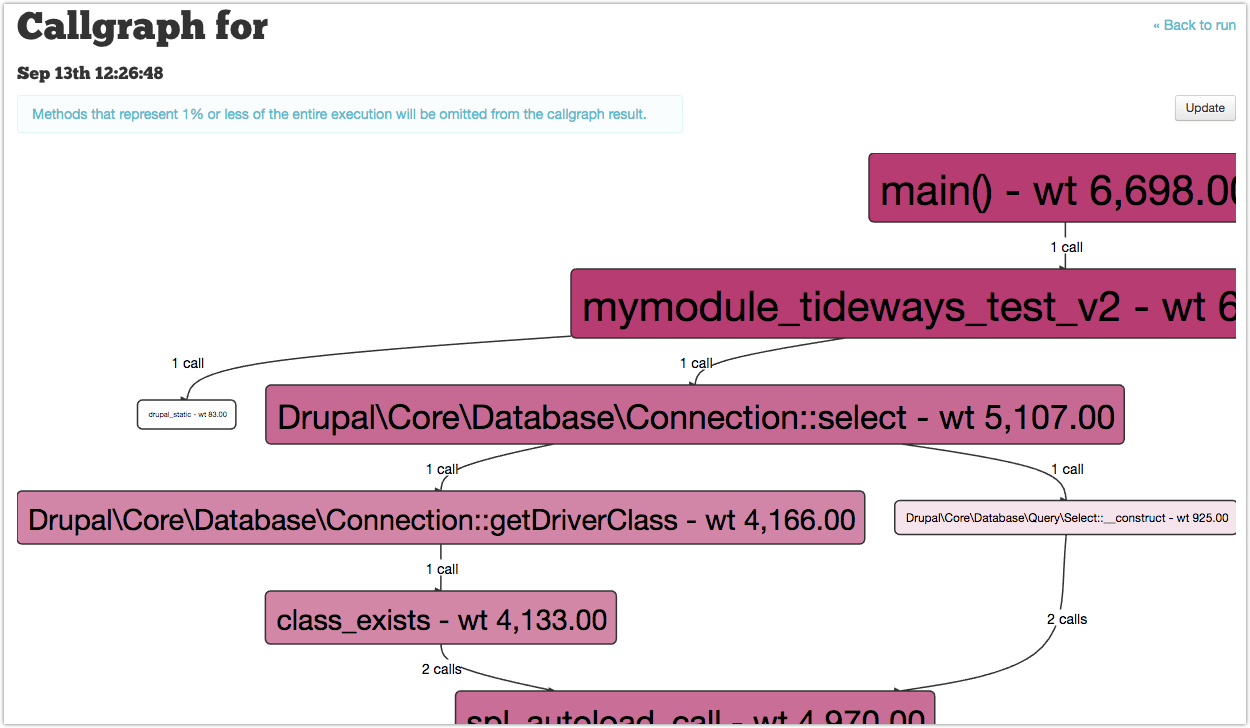
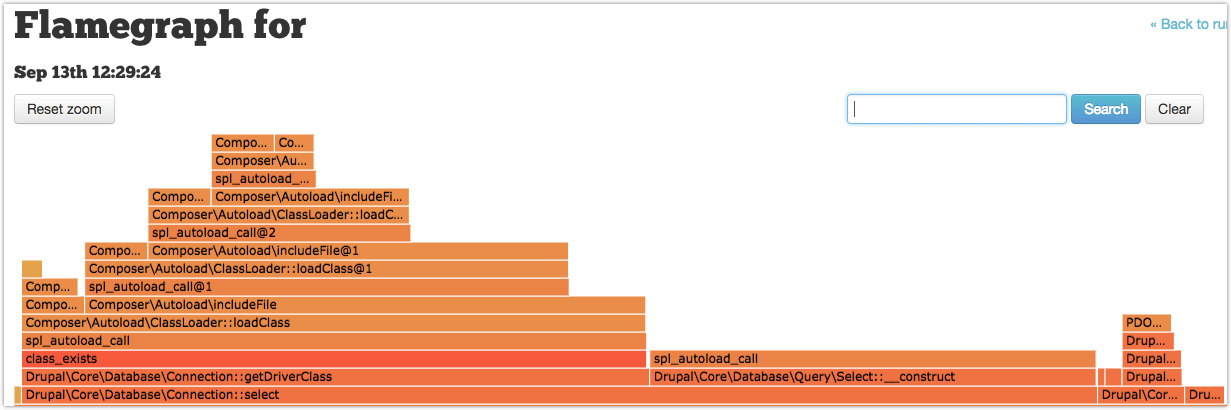
For PHP 7 the recommendation is to use Tideways; it’s a modern fork of xhprof. After collecting (tracing/profiling) the data with Tideways you need a way to analyze the data. I used a Docker environment to get Xhgui running. Here’s what a few xhgui screens look like. The best part is that nearly everything is clickable so you can drill down to figure out what’s slow, and why!

Awesome, right!?
Getting this all going wasn’t a simple process, so hopefully this provides some useful info for you.
DISCLAIMER: I’m manually profiling specific function calls and then pulling that data into Xhgui with a command line command; it doesn’t show up in Xhgui automatically. If I end up needing automatic Xhgui integration I’ll post an update.
Step 1: Configure Site in DevDesktop
Configure your site however you normally do, but choose 7.0.14 as the PHP version.
Step 2: Install Tideways extension for DevDesktop PHP 7
|
1 2 3 4 5 6 7 8 9 10 |
cd /Applications/DevDesktop/php7_0/ext git clone https://github.com/tideways/php-profiler-extension.git cd php-profiler-extension /Applications/DevDesktop/php7_0/bin/phpize ./configure CC="gcc -arch i386" CXX="g++ -archi i386" -with-php-config=/Applications/DevDesktop/php7_0/bin/php-config make sudo make install cd ../ (make sure you are in the 'ext' dir) rm -rf php-profiler-extension wget https://github.com/tideways/profiler/releases/download/v2.0.15/Tideways.php |
Step 3: Configure Tideways
Add to the bottom of /Applications/DevDesktop/php7_0/bin/php.ini
|
1 2 3 4 5 6 7 |
extension="/Applications/DevDesktop/php7_0/ext/tideways.so" tideways.sample_rate=100 tideways.framework=drupal8 tideways.monitor=full tideways.auto_prepend_library=0 tideways.auto_start=0 tideways.load_library=0 |
Step 4: Reboot apache/mysql
Stop and Start via the DevDesktop control panel.

![]()
Step 6: Profile something!
My recommendation is to write a simple function that you can call via Drush to test the setup. Here’s an example:
|
1 2 3 4 5 6 7 8 9 10 11 12 13 14 15 16 17 18 19 20 21 22 23 24 25 26 27 28 29 30 31 32 33 34 35 36 37 38 39 40 41 42 43 44 45 46 47 48 49 50 51 52 53 54 55 56 57 58 59 60 61 |
/** * Start tideways profiling. */ function mymodule_tideways_start() { if (function_exists('tideways_enable')) { tideways_enable(TIDEWAYS_FLAGS_NO_SPANS + TIDEWAYS_FLAGS_CPU + TIDEWAYS_FLAGS_MEMORY); } } /** * Stop tideways profiling and store an xhprof file. * * @param string $url_or_desc * URL or text description for the URL meta field in Xhgui. */ function mymodule_tideways_stop($url_or_desc = '') { if (function_exists('tideways_disable')) { $data = []; // Store the tideways data. $data['profile'] = tideways_disable(); // See xhgui/external/header.php for examples of what xhgui wants in $data. $time = array_key_exists('REQUEST_TIME', $_SERVER) ? $_SERVER['REQUEST_TIME'] : time(); $request_time_float = explode('.', $_SERVER['REQUEST_TIME_FLOAT']); if (!isset($request_time_float[1])) { $request_time_float[1] = 0; } $request_ts = array('sec' => $time, 'usec' => 0); $request_ts_micro = array('sec' => $request_time_float[0], 'usec' => $request_time_float[1]); // Include helpful information for the main screens. $data['meta'] = array( 'url' => $url_or_desc, 'SERVER' => $_SERVER, 'get' => $_GET, 'env' => $_ENV, 'request_ts' => $request_ts, 'request_ts_micro' => $request_ts_micro, 'request_date' => date('Y-m-d', $time), ); if (!file_exists('/tmp/xhprof')) { mkdir('/tmp/xhprof', 0777, TRUE); } file_put_contents( '/tmp/xhprof/mymodule_' . date('Y-m-d_H-i-s') . '.xhprof', json_encode($data) ); } } /** * Test tideways profiling. */ function mymodule_tideways_test() { mymodule_tideways_start(); $trial_nums = _mymodule_trials_get_mymodule_trial_numbers(); mymodule_tideways_stop(); } |
After that’s in place and the caches are cleared, just execute with drush:
|
1 |
drush ev "mymodule_tideways_test();" |
If things went well you should see a new file like /tmp/xhprof/mysite_2017-09-13_11-34-18.xhprof and the should contain lots of data!
If you don’t get a file you’ll have to dig into the configuration.
If you executed the function call with drush, make sure Drush is using the same PHP binary and configuration as your site. php --info | grep -i tideways will show if tideways is available to Drush.
If your site doesn’t know what “tideways_enable()” is you’ll have to figure out why the extension didn’t load. phpinfo() should show a bunch of tideways variables.
Step 7: Setup xhgui Docker instance
If you don’t have profile data (JSON) in an .xhprof file, please go back… you need data that you can feed to xhgui before you can play with xhgui.
Prepare the Image Code
I cloned xhgui-docker into ~/docker/images/xhgui-docker and had to make a few changes to get it to build correctly.
Here’s the diff of the changes I made:
|
1 2 3 4 5 6 7 8 9 10 11 12 13 14 15 16 17 18 19 20 21 22 23 24 25 26 27 28 29 30 31 32 33 34 |
diff --git a/Dockerfile b/Dockerfile index 42851eb..51607a8 100644 --- a/Dockerfile +++ b/Dockerfile @@ -15,6 +15,12 @@ RUN apt-get update && apt-get install -y libmcrypt-dev && docker-php-ext-install # install libssl for pecl RUN apt-get install -y libssl-dev +# install libzip for pecl +RUN apt-get install -y libzip-dev + +# just in case +RUN apt-get install -y vim + # install mongodb driver and zip extension via pecl RUN pecl install mongodb && docker-php-ext-enable mongodb RUN pecl install zip && docker-php-ext-enable zip @@ -38,4 +44,4 @@ RUN chown -R www-data:www-data /var/www/xhgui CMD service nginx start && php-fpm -D && mongod # expose nginx and mongodb ports -EXPOSE 80 27017 \ No newline at end of file +EXPOSE 80 27017 diff --git a/php-fpm/timezone.ini b/php-fpm/timezone.ini index 7e51a82..b8e5d0e 100644 --- a/php-fpm/timezone.ini +++ b/php-fpm/timezone.ini @@ -1,2 +1,2 @@ -# default timezone is necessary for xhgui -date.timezone = 'Europe/Moscow' \ No newline at end of file +; default timezone is necessary for xhgui +date.timezone = 'America/New_York' |
Build the Image
|
1 2 |
cd ~/docker/images/xhgui-docker docker build -t agileadam/xhgui . |
Step 8: Setup Docker Container
|
1 2 |
mkdir /tmp/xhprof docker run -v /tmp/xhprof:/tmp/xhprof -d -p 8081:80 agileadam/xhgui |
Once that is up and running you should be able to visit 127.0.0.1:8081 in your browser. You will hopefully see the Xhgui application.
Step 9: Import the Data Into Xhgui’s Mongo DB
Method 1
|
1 2 |
docker ps (to get the ID of the running container) docker exec -u root -it f76a579bc4551c php external/import.php -f /tmp/xhprof/swog_2017-09-13_16-43-37.xhprof |
Method 2
|
1 2 3 |
docker ps (to get the ID of the running container) docker exec -u root -it f76a579bc4551c bash php external/import.php -f /tmp/xhprof/mysite_2017-09-13_11-34-18.xhprof |
Method 3 (PREFERRED)
If you’re using Fish you can drop these scripts into your ~/.config/fish/functions directory:
xhgui_wipe.fish (wipes out all runs in the xhgui database)
|
1 2 3 |
function xhgui_wipe docker exec -u root -it f76a579bc4551c mongo xhprof --eval "db.results.remove({});" end |
xhgui_import_latest.fish (import latest file from /tmp/xhprof/)
|
1 2 3 4 5 6 7 8 9 10 11 12 13 14 15 16 17 18 19 20 21 22 |
function xhgui_import_latest set latest "/tmp/xhprof/"(ls -Art /tmp/xhprof | tail -n 1) # Only import items we haven't imported yet if test $latest = $xhgui_import_latest_filename set_color red echo "[ERROR] $latest already imported." return end if test -f $latest echo "Running: docker exec -u root -it f76a579bc4551c php external/import.php -f $latest" set_color green command docker exec -u root -it f76a579bc4551c php external/import.php -f $latest; and echo "Done!" # TODO make sure it actually worked before setting this variable set -U xhgui_import_latest_filename $latest else set_color red echo "[ERROR] could not find latest /tmp/xhprof/foobar.xhprof file." end end |
xhgui_import.fish [filename] (import specific xhprof file)
|
1 2 3 4 5 6 7 8 9 10 11 12 13 14 15 16 |
function xhgui_import if test -f $argv switch $argv case "/tmp/xhprof/*" echo "Running: docker exec -u root -it f76a579bc4551c php external/import.php -f $argv" set_color green command docker exec -u root -it f76a579bc4551c php external/import.php -f $argv; and echo "Done!" case "*" set_color red echo "[ERROR] path must start with \"/tmp/xhprof\"" end else set_color red echo "[ERROR] could not find file." end end |
Other Tips
Manually Clearing MongoDB Results
|
1 2 3 4 5 6 |
docker exec -u root -it f76a579bc4551c bash $ mongo > use xhprof > db.results.remove({}) |
One Comment
Chris Porter
This tutorial was fantastic! Thanks for publishing it!
A few notes from my experience with this:
In step 2:
1) the configure command may not need the -C option. (not everyone is using i386 architecture, and not everyone has the same complier – so it’s better to let the configure command resolve this)
2) the –with-php-config option *saved my life* I had been struggling to figure out why compiling wasn’t working right. THANKS
3) the tideways project has renamed the extension to be tideways_xhprof, rather than just tideways. so after “make install” the file that is put in ext/ as tideways_xhprof.so
in step 3:
1) the php.ini file for devdesktop already refrences the path to ext, so just the name of the extension is all that’s needed, rather than the full path. (this also might confuse people who installed devdesktop to a directory other than /Applications/DevDesktop
2) the extension name is now tideways_xhprof.so
3) i’m not positive, but i’d guess that the configuration options are now also tideways_xhprof.xyz (this will need testing)
Step 5) There is no step 5!?
in step 6:
1) the function names and flags to check for and use are now ‘tideways_xhprof_enable’
in step 7:
1) to “prepare the image code”. you can’t just do a straight up git clone. the project contains a git submodule, so a git clone –recursive is required. If you got burned by this, just run a “git submodule init;git submodule update” to get the code that was left out. Your docker build will fail w/o this.
2) I had a lot of trouble getting the image to build. this had to do with a few things:
a) GNUPG, GNUPG2 or GNUPG3 are required now in order to install the key certificate.
b) mongo requires several prerequisites that can’t be found. this is because the repo that is added goes directly to the backport of the mongo library specifically. so none of the backported dependencies can be installed. I added: “deb http://ftp.debian.org/debian jessie-backports main” as a location and that kickstarted everything into working.
c) the prepared code from earlier requires composer install to happen. that composer file requires mongo *on the machine that composer is running on*. so you either need exactly the same mongo installed on osx, or you need to download and run composer on the docker instance. I chose the later to ensure compatibility between systems.
After that, the image builds just fine.
Again, thanks for this tutorial, it was super helpful! hopefully these notes help you get it finalized!