-
Using “php artisan serve” with xdebug and PHPStorm
This is more of a person note for myself. This posts assumes some knowledge of php, Laravel, artisan, Homebrew, and xdebug.
I’ve been using php artisan serve to serve Laravel applications locally. It’s quick and it works well.
It’s probably not a great solution if you’re working with other people on a project, or if you want to implement a good CD/CI workflow. Having said that, it’s what I’m using today, so I figured I’d document how I got xdebug working with it (on my Mac).
-
Using Carbon to Generate Random Dates and Times
There are a number of ways to generate random dates/times in PHP. Here are some examples using the Carbon library:
1234567891011// Between now and 180 days agoCarbon::today()->subDays(rand(0, 180))> 2021-09-02 00:00:00> 2021-06-23 00:00:00> 2021-05-23 00:00:00// Between now and 180 days ago with random timeCarbon::today()->subDays(rand(0, 179))->addSeconds(rand(0, 86400));> 2021-06-11 22:35:03> 2021-10-24 13:19:53> 2021-06-09 20:47:44 -
Adding a Global Function to Cypress for a Date {num} Months Ago
I’m working on a COVID-19 booster shot registration form. On this form I ask the user when they received their last COVID-19 vaccine shot. This is three simple fields (the month values are 01, 02, 03, etc.):

Each vaccine brand (Pfizer, Moderna, J&J) has different eligibility criteria as it relates to the time since the individual received their original vaccine series. Pfizer, for example, is 6 months. My form needs to reject a user who says they received Pfizer less than 6 months ago.
Using Cypress I wanted some test coverage of this functionality. Original I had hard-coded a date value of 5 months ago:
123cy.get('select[name="datelastvax_month"]').select('08');cy.get('select[name="datelastvax_day"]').select('01');cy.get('select[name="datelastvax_year"]').select('2021');As you can imagine this would work well for a while. Fast-forward a few months from now… the time ago will eventually be more than 6 months ago. I don’t want to have to keep updating this code with a recent date. The obvious solution is to dynamically choose the dates based on the current date. A global helper function would be ideal as I need to use this in many tests. Here’s a simple solution:
Step 1: Define the Function in index.js
The support/index.js file is loaded before each Cypress run. Creating a global function here is a quick way to introduce a reusable piece of code.
12345678910111213141516171819202122/*** Returns a simple object for {num} months ago, containing YYYY, MM, DD.** @param {number} num* Number of months to subtract from current date.** @return object* Object containing three properties (year:YYYY, month:MM, day:DD)*/cy.getDateMonthsAgo = (num) => {const dateObj = new Date(new Date().getFullYear(),new Date().getMonth() - num,new Date().getDate());return {year: dateObj.getFullYear().toString(),month: ('0' + (dateObj.getMonth() + 1)).slice(-2),day: ('0' + dateObj.getDate()).slice(-2),}}There are many solutions to handle getting a date from {num} months ago. If you start looking around for “What is a month, really?” you will find many different opinions. The code I’m using above responds like most humans do: give the same day of the month from {num} months ago. With a {num} of 5 (five months ago), on October 25, 2021 the result would be May 25, 2021.
WARNING: Please note the following:
12345new Date(2021, 1, 28) ==> February 28, 2021new Date(2021, 1, 29) ==> March 1, 2021new Date(2021, 1, 30) ==> March 2, 2021new Date(2021, 1, 31) ==> March 3, 2021new Date(2021, 1, 32) ==> March 4, 2021Step 2: Use the Function
1234const fiveMonthsAgo = cy.getDateMonthsAgo(5);cy.get('select[name="datelastvax_month"]').select(fiveMonthsAgo.month);cy.get('select[name="datelastvax_day"]').select(fiveMonthsAgo.day);cy.get('select[name="datelastvax_year"]').select(fiveMonthsAgo.year); -
PERT Estimates – Using Three-Point Estimation to Improve Accuracy
Background & Method
I’ve long been a promoter of using three-point estimates for improved accuracy when estimating tasks.
When I estimate how long a task will take to execute, I imagine three separate circumstances in an effort to improve the accuracy of my estimate:
- Optimistic: How quickly could I get this task done if everything went perfectly. What if I realize some unexpected “wins” that get me to the finish line faster?
- Realistic: When I think about my performance executing similar tasks in the past, what’s my best guess at an average amount of time needed?
- Pessimistic: Sometimes nothing seems to go well. If things do not come together as expected, what’s the longest (within reason) you can imagine this task taking?
If I’ve truly thought about each of these, I can use them as variables in a simple formula, and can get a more accurate time estimate as a result.
This formula, (Best+(Real*2)+(Worst*3))/6 , puts more emphasis on the worst-case scenario (#3 above) as things seem to always take longer than expected to execute. Sometimes I use two versions of the formula (one that puts even more emphasis on pessimistic).
One more thing worth noting: You’ll see I used “I” and “my” a lot above; I do not recommend estimating tasks you are not executing, personally. I recommend having the responsible party estimate the task whenever possible. Explain the PERT process to them.
Usage
While this formula is simple, and adjustable (alter the weights as you see fit), it would take some time to manually calculate the result for each task.
I utilize a few tools to generate PERT estimates at the speed of thought.
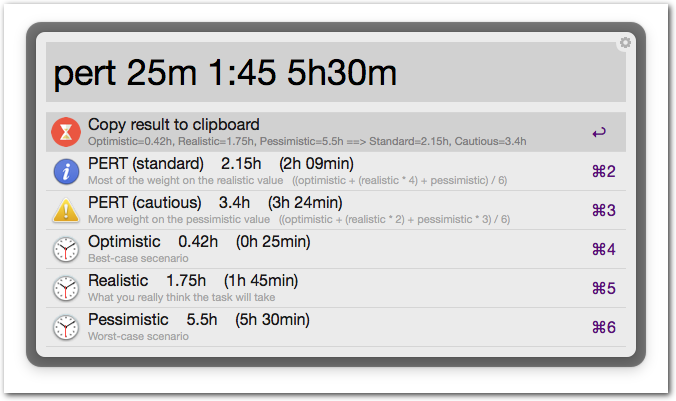
First, I’ve written an Alfred plugin to make the process simple. This is my most used method of generating PERT estimates. Here’s a screenshot to give you a taste:
I’ve also created many spreadsheets over the years. These often look similar to this:

-
Simple OAuth Token Handling with Cypress
Here’s a quick (and dirty?) way to handle requesting an access token and using it in a subsequent request.
You should probably pull the client_secret from an environment variable (not shown below).
commands.js
12345678910111213141516/*** Get an oAuth access token.*/Cypress.Commands.add('getOauthAccessToken', () => {cy.request({method: 'POST',url: '/oauth/token',form: true,body: {grant_type: 'client_credentials',client_id: 'xxxxxxxx-xxxx-xxxx-xxxx-xxxxxxxxxxxx',client_secret: 'xxxxxxxxxxxxxxxxxxxx',scope: '',},});});some-tests.spec.js
12345678910111213141516171819describe('API Foobar', function() {it('Gets expected values from GET /oauth/debug', function() {cy.getOauthAccessToken().then(oAuthResp => {cy.request({method: 'GET',url: '/oauth/debug?_format=json',headers: {'Authorization': `Bearer ${oAuthResp.body.access_token}`,},}).should((resp) => {expect(resp.status).to.eq(200);expect(resp.body.roles).to.deep.contain('authenticated');expect(resp.body.roles).to.deep.contain('api_foobar');});});});}); -
Remote PHP Debugging with Xdebug + PHPStorm or VSCode on Cloudways
Here’s a quick breakdown of the steps required to debug a PHP site on a remote Cloudways server.
Step 1:
Enable xdebug for the whole Cloudways server:
Server » Settings & Packages » Advanced » XDEBUG: Enabled
Step 2:
For the specific application in Cloudways, add some PHP settings:
Application » Application Settings » PHP FPM Settings:
123php_value[xdebug.mode] = debugphp_value[xdebug.start_with_request] = yesphp_value[xdebug.remote_connect_back] = 1Step 3: Setup SSH config for an ssh tunnel to the server:
- Edit
~/.ssh/config
1234Host mhd1_xdebugHostName 44.33.222.111User master_acevddddddRemoteForward 9003 localhost:9003Step 4 (PHPStorm):
Configure PHPStorm Preferences
- PHP » Debug » Xdebug » Debug port = 9003
- PHP » Debug » Xdebug — Check all four boxes:
- Can accept external connections
- Resolve breakpoint if it’s not available on the current line
- Force break at first line when no path mapping specified
- Force break at first line when a script is outside the project
- You shouldn’t need to configure servers, PHP cli, deployment locations, or anything similar…
Try It
- Start an SSH tunnel:
ssh mhd1_xdebug - Drop a breakpoint in index.php (or whatever will surely execute)
- Visit the site, then wait for PHPStorm to prompt you for which file to connect to. Choose accordingly. It should connect and pause. You only have to do this once; it’ll remember the settings and path mapping in PHP » Servers.
Step 4 (VSCode)
Configure VSCode Preferences
- Install https://marketplace.visualstudio.com/items?itemName=felixfbecker.php-debug
- Click the Run and Debug sidebar icon (⌘⇧D)
- SSH into the server to find the exact path to the root of the site (which should match the root of your repo locally, your workspace folder)
- Add new configuration (you can disable the log option if things work well right away)
123456789101112131415{"version": "0.2.0","configurations": [{"name": "Listen for Xdebug","type": "php","request": "launch","port": 9003,"pathMappings": {"/home/511111.cloudwaysapps.com/crwysaaaaa/public_html": "${workspaceFolder}",},"log": true},]}Try it
- Start an SSH tunnel:
ssh mhd1_xdebug - Click Listen for Xdebug in the Run and Debug screen
- Drop a breakpoint in index.php (or whatever will surely execute)
- Visit the site
- Edit
-
Setting a Specific External Port for MySQL in Lando
Lando sets an external MySQL port dynamically by default. This means every time you (re)start a lando app it gets (potentially) a different external MySQL port. This is an annoyance as you have to change your port in TablePlus, SequelPro, or whatever MySQL GUI you’re using.
There is a simple fix: use a local lando file to override the forwarded MySQL port. These steps assume you already have a working .lando.yml file.
Step 1: Create a local lando file: .lando.local.yml
123services:database:portforward: 3307 <-- Specify an available port hereStep 2: Run lando rebuild if you’ve already started the site in the past
Step 3: Verify the settings by running lando info
1234567891011121314151617181920212223242526272829adam@acmbp sandbox % lando info[ { service: 'appserver',urls:[ 'https://localhost:50126','http://localhost:50127','http://sandbox.lndo.site/','https://sandbox.lndo.site/' ],type: 'php',healthy: true,via: 'apache',webroot: '.',config: {},version: '7.3',meUser: 'www-data',hasCerts: true,hostnames: [ 'appserver.sandbox.internal' ] },{ service: 'database',urls: [],type: 'mysql',healthy: true,internal_connection: { host: 'database', port: '3306' },external_connection: { host: '127.0.0.1', port: '3307' },healthcheck: 'bash -c "[ -f /bitnami/mysql/.mysql_initialized ]"',creds: { database: 'main_db', password: 'main_pass', user: 'main_user' },config: {},version: '5.7',meUser: 'www-data',hasCerts: false,hostnames: [ 'database.sandbox.internal' ] } ]Step 4: Add .lando.local.yml to your .gitignore file
This site will always get the port you specified if it’s available when you start the app. You can use this port in your MySQL gui, scripts, etc.
-
Setting a LIMIT on an UPDATE query in Drupal 8 / 9
Here’s a quick tip regarding Drupal database manipulation. Specifically, I needed a way to flip a boolean value (from 1 to 0) on the first N rows in a database table that matched a specific set of conditions.
The Problem
It seems you cannot enforce a LIMIT on an UPDATE query using a static query in Drupal.
Here’s what I was trying to do:
1234567$db = \Drupal::database();$query = $db->query('UPDATE {mytable} SET ondemand=:zero WHERE ondemand=:one ORDER BY imported_at ASC LIMIT :limit', [':zero' => 0,':one' => 1,':limit' => $qtyToConvert,]);$query->execute();This throws an error. I believe the issue is caused by the variable substitution wrapping the limit value in quotes. The error message starts with:
1SQLSTATE[42000]: Syntax error or access violation: 1064 You have an error in your SQL syntax; check the manual that corresponds to your MySQL server version for the right syntax to use near ''10'' at line 1...If you run this query manually in MySQL, it works fine with
LIMIT 10but doesn’t work withLIMIT '10'(it throws the same error shown above).The Solution
Given dynamic queries are favored over static queries, and that this static query doesn’t work, I ended up getting to the finish line with two dynamic queries.
I have tested the solution on 10,000 records and it took < 6 seconds to process the entire request on my local dev lando site.
“code” is a unique identifier column in the database table.
12345678910111213$db = \Drupal::database();$query = $db->select('mytable', 'mt')->condition('ondemand', 1)->orderBy('imported_at')->fields('mt', ['code'])->range(0, $qtyToConvert);$codesToReset = $query->execute()->fetchCol();$db->update('mytable')->fields(['ondemand' => 0])->condition('code', $codesToReset, 'IN')->execute();return count($codesToReset); -
Missing Titles on Drupal 8 ECK Content Listings
UPDATE: I discovered the solution below was only working when the Title base field was enabled for the entity type. If you enable the title field on the entity type it works, but then the title is required to save a new record. I will look for an alternative solution to avoid using the Title field altogether. Also, I’ll look into https://www.drupal.org/project/eck/issues/2785297.
I’ve recently run into an issue with an ECK-created custom entity type. There was no reason for me to use the “Title” field on this particular entity type. Unfortunately, when you don’t have a title field several of the built-in entity listings and displays seem broken. Here’s what the Content List screen looks like, for example:
-
Adding Custom Fields to the Field Edit Screen in Drupal 8 / 9
Introduction
I’m building an API with Drupal 8/9. There is additional information I want to track against each field instance in each content type (or custom entity type) in the system. This information includes where the field’s data comes from, who is responsible for maintaining it, etc. This is useful for the site administrator and developers to track where things are coming from. Drupal’s Third Party Settings functionality makes this easy.
Result
This is what you see when you edit the First name field:
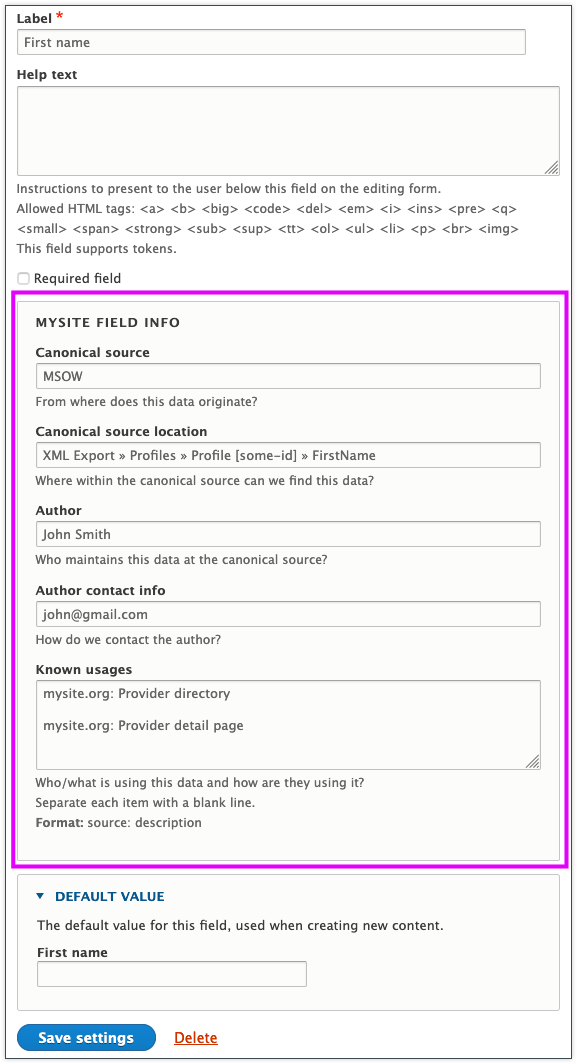
When you click Save settings the data is saved to this specific field’s instance configuration (meaning if you reuse this field you can fill the info out differently per instance).
Solution
There are two ways to achieve this. In both cases, we use hook_form_FORM_ID_alter() to introduce the new fields. I am doing this within a custom module called pdms. The code lives in pdms.module.
Method #1:
With this method, the system automatically handles storing the value into the field configuration’s third party settings.
This happens because we use the third_party_settings key.
123456789101112131415/*** Implements hook_form_FORM_ID_alter().*/function pdms_form_field_config_edit_form_alter(&$form, FormStateInterface $form_state, $form_id) {$entity = $form_state->getFormObject()->getEntity();$form['third_party_settings']['pdms']['canonical_source'] = ['#type' => 'textarea','#title' => t('Canonical source'),'#description' => t('From where does this data originate?'),'#default_value' => $entity->getThirdPartySetting('pdms', 'canonical_source'),];... etc ...}The issue I had with this approach is that I could not get it to work if I put the fields in a fieldset (as shown in the screenshot).
I think it’d be a matter of getting $entity->getThirdPartySetting() to look into the fieldset somehow. If you know how to do this, please let me know!
Method #2:
This method gives us more control over what happens when the form is submitted.
Because we have more control we’re able to traverse the fieldset easily.
You can see, too, how I unset the third party setting if the value is empty. I am not sure if I’ll keep this in place; we’ll see if it causes any issues when I attempt to build a report showing all of the fields and their info.
123456789101112131415161718192021222324252627282930313233343536373839404142434445464748495051525354555657585960616263646566676869/*** Implements hook_form_FORM_ID_alter().*/function pdms_form_field_config_edit_form_alter(&$form, FormStateInterface $form_state, $form_id) {$entity = $form_state->getFormObject()->getEntity();$form['#entity_builders'][] = 'pdms_set_third_party_settings_field_info';$form['pdms_field_info'] = ['#type' => 'fieldset','#title' => 'MySite Field Info',];$form['pdms_field_info']['canonical_source'] = ['#type' => 'textfield','#title' => t('Canonical source'),'#description' => t('From where does this data originate?'),'#default_value' => $entity->getThirdPartySetting('pdms', 'canonical_source'),];$form['pdms_field_info']['canonical_source_location'] = ['#type' => 'textfield','#title' => t('Canonical source location'),'#description' => t('Where within the canonical source can we find this data?'),'#default_value' => $entity->getThirdPartySetting('pdms', 'canonical_source_location'),];$form['pdms_field_info']['author'] = ['#type' => 'textfield','#title' => t('Author'),'#description' => t('Who maintains this data at the canonical source?'),'#default_value' => $entity->getThirdPartySetting('pdms', 'author'),];$form['pdms_field_info']['author_contact_info'] = ['#type' => 'textfield','#title' => t('Author contact info'),'#description' => t('How do we contact the author?'),'#default_value' => $entity->getThirdPartySetting('pdms', 'author_contact_info'),];$form['pdms_field_info']['known_usages'] = ['#type' => 'textarea','#title' => t('Known usages'),'#description' => t('Who/what is using this data and how are they using it?<br/>Separate each item with a blank line.<br/><strong>Format:</strong> source: description</strong>'),'#default_value' => $entity->getThirdPartySetting('pdms', 'known_usages'),];}/*** Entity builder for PDMS field info third party settings.*/function pdms_set_third_party_settings_field_info($entity_type, $entity, &$form, \Drupal\Core\Form\FormStateInterface $form_state) {$fields = ['canonical_source','canonical_source_location','author','author_contact_info','known_usages',];foreach ($fields as $field_name) {if ($form_state->getValue($field_name)) {$entity->setThirdPartySetting('pdms', $field_name, $form_state->getValue($field_name));}else {$entity->unsetThirdPartySetting('pdms', $field_name);}}