-
Correcting Date Tags using sed in an Entire Obsidian Vault
I’ve been using Obsidian for about 8 months. It wasn’t until today that I realized I’ve been using hierarchical tags incorrectly since day one!
The Problem
In my templater templates I was using the following:
1#<% tp.date.now("YYYY-MM-DD") %>/<% tp.date.now("YYYY-MM") %>/<% tp.date.now("YYYY") %> #<% tp.date.now("YYYY-MM-DD") %>The result of this is:
1#2022-03-17/2022-03/2022 #2022-03-17Unfortunately there are two problems with this. First, there is no need for that extra tag at the end; it’s already covered by the first combo tag.
Second, the hierarchy is backwards! This leads to:
123456├── 2022-03-16│ └── 2022-03│ └── 2022└── 2022-03-17└── 2022-03└── 2022Houston, we have a problem! What I really was after was a tag structure like this:
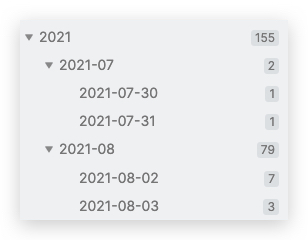
1234└── 2022└── 2022-03├── 2022-03-16└── 2022-03-17The Fix
Thankfully, Obsidian stores all of the files on the filesystem natively, which means you can manipulate them using whatever tools you’d like.
Enter sed, a stream editor. Using sed and find, I was able to quickly resolve both of the issues above.
If I’d taken a little more time I would have handled both problems in one shot, but I did not. I fixed problem 2, then problem 1.
First, I cd’d into the root directory of my vault. Then…
1234567891011# Find markdown files, feed them to sed,# edit the file "in place" (modify them directly)# We use capture groups (the parentheses) to# essentially reverse the order of the tagsfind . -type f -name '*.md' -print0 | xargs -0 sed -E -i "" "s/#([0-9]{4}-[0-9]{2}-[0-9]{2})\/([0-9]{4}-[0-9]{2})\/([0-9]{4})/#\3\/\2\/\1/g"# Find #YYYY/YYYY-MM/YYYY-MM-DD #YYYY-MM-DD,# capturing the first tag to "\1"# Replace with the capture group (thereby dropping the second tag)find . -type f -name '*.md' -print0 | xargs -0 sed -E -i "" "s/(#[0-9]{4}\/[0-9]{4}-[0-9]{2}\/[0-9]{4}-[0-9]{2}-[0-9]{2}) #[0-9]{4}-[0-9]{2}-[0-9]{2}/\1/g"Finally, I updated all of my templater templates to drop the second tag and fix the first to be in the right order.
Obsidian picked up all of the changes immediately, which were reflected in the tag pane. Much cleaner!
-
Editing a DEVONThink Markdown File in VS Code
This is a sister post to Editing Web Content in VS Code.
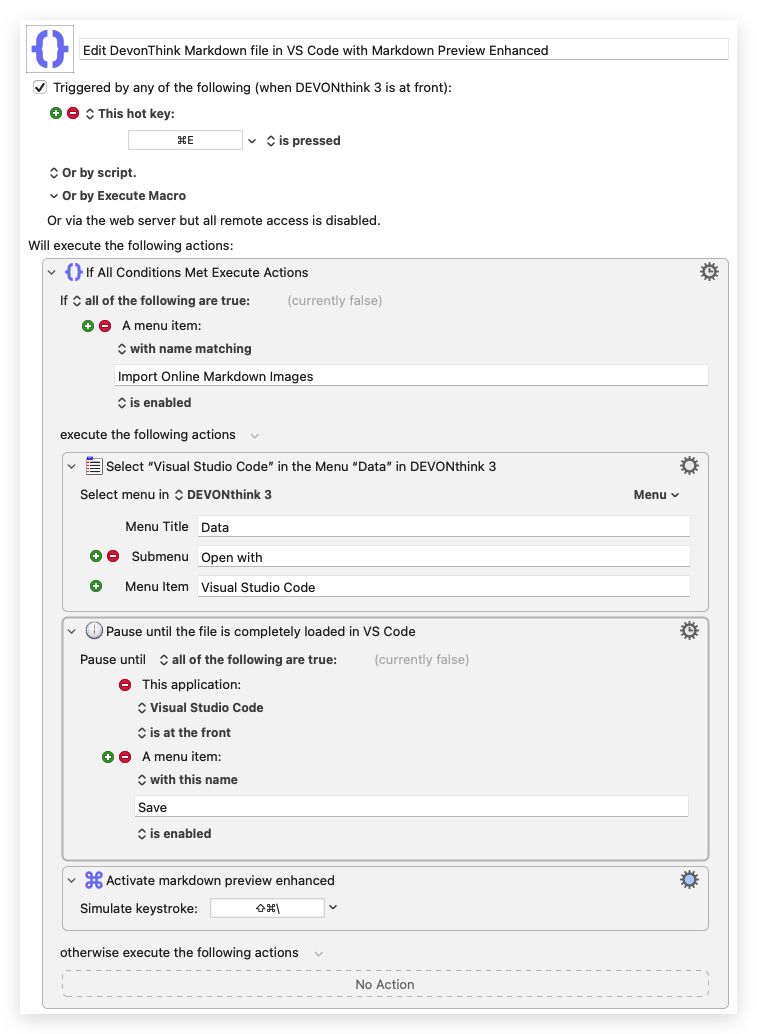
This simple macro opens the current file (if Markdown) in VS Code, with the Markdown Preview Enhanced pane open on the right automatically.
-
Editing Web Content in VS Code
Okay, so it’s not quite as amazing as the title suggests, but this solution is worth sharing.
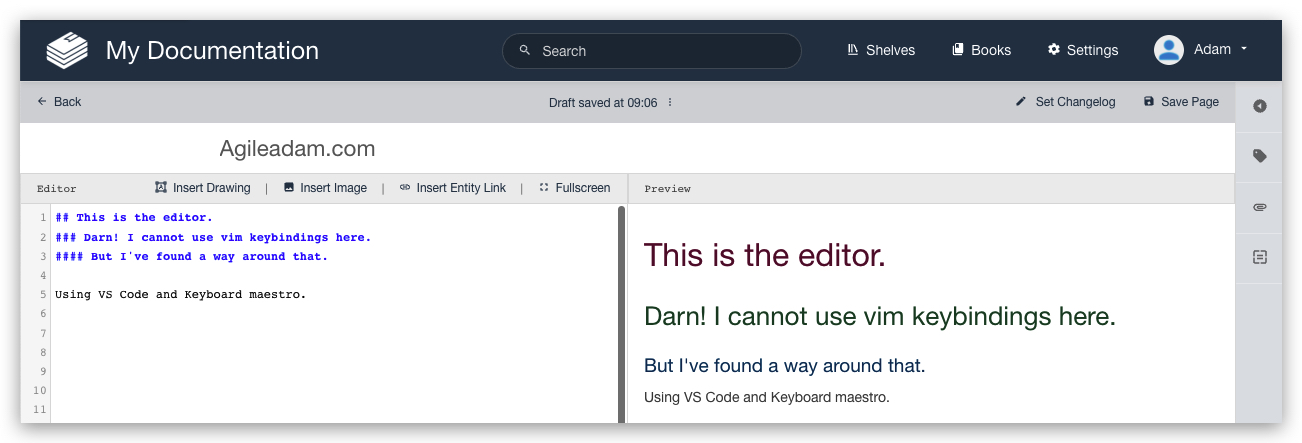
I work a lot in Bookstack. It’s a fantastic documentation system built with Laravel. I edit all pages in markdown. There is a markdown pane on the left and a preview on the right. I love the UI (shown below) but unfortunately I cannot move around in the editor like I can in PHPStorm or VS Code, where I have Vim support.
I have a Chrome extension called Wasavi, which is incredible for editing text areas in an inline virtual Vim window. Unfortunately, though, it doesn’t show realtime feedback in the preview pane until I save and close out of the virtual editor.
It occurred to me it’d be useful to just pop into VS Code quickly to edit the doc, then bring those edits back into the Bookstack editor in Chrome. At first I dismissed the idea as being “too much work.” After thinking about it for a moment, though, I realized I could MacGyver this relatively quickly with my favorite Mac application, Keyboard Maestro.
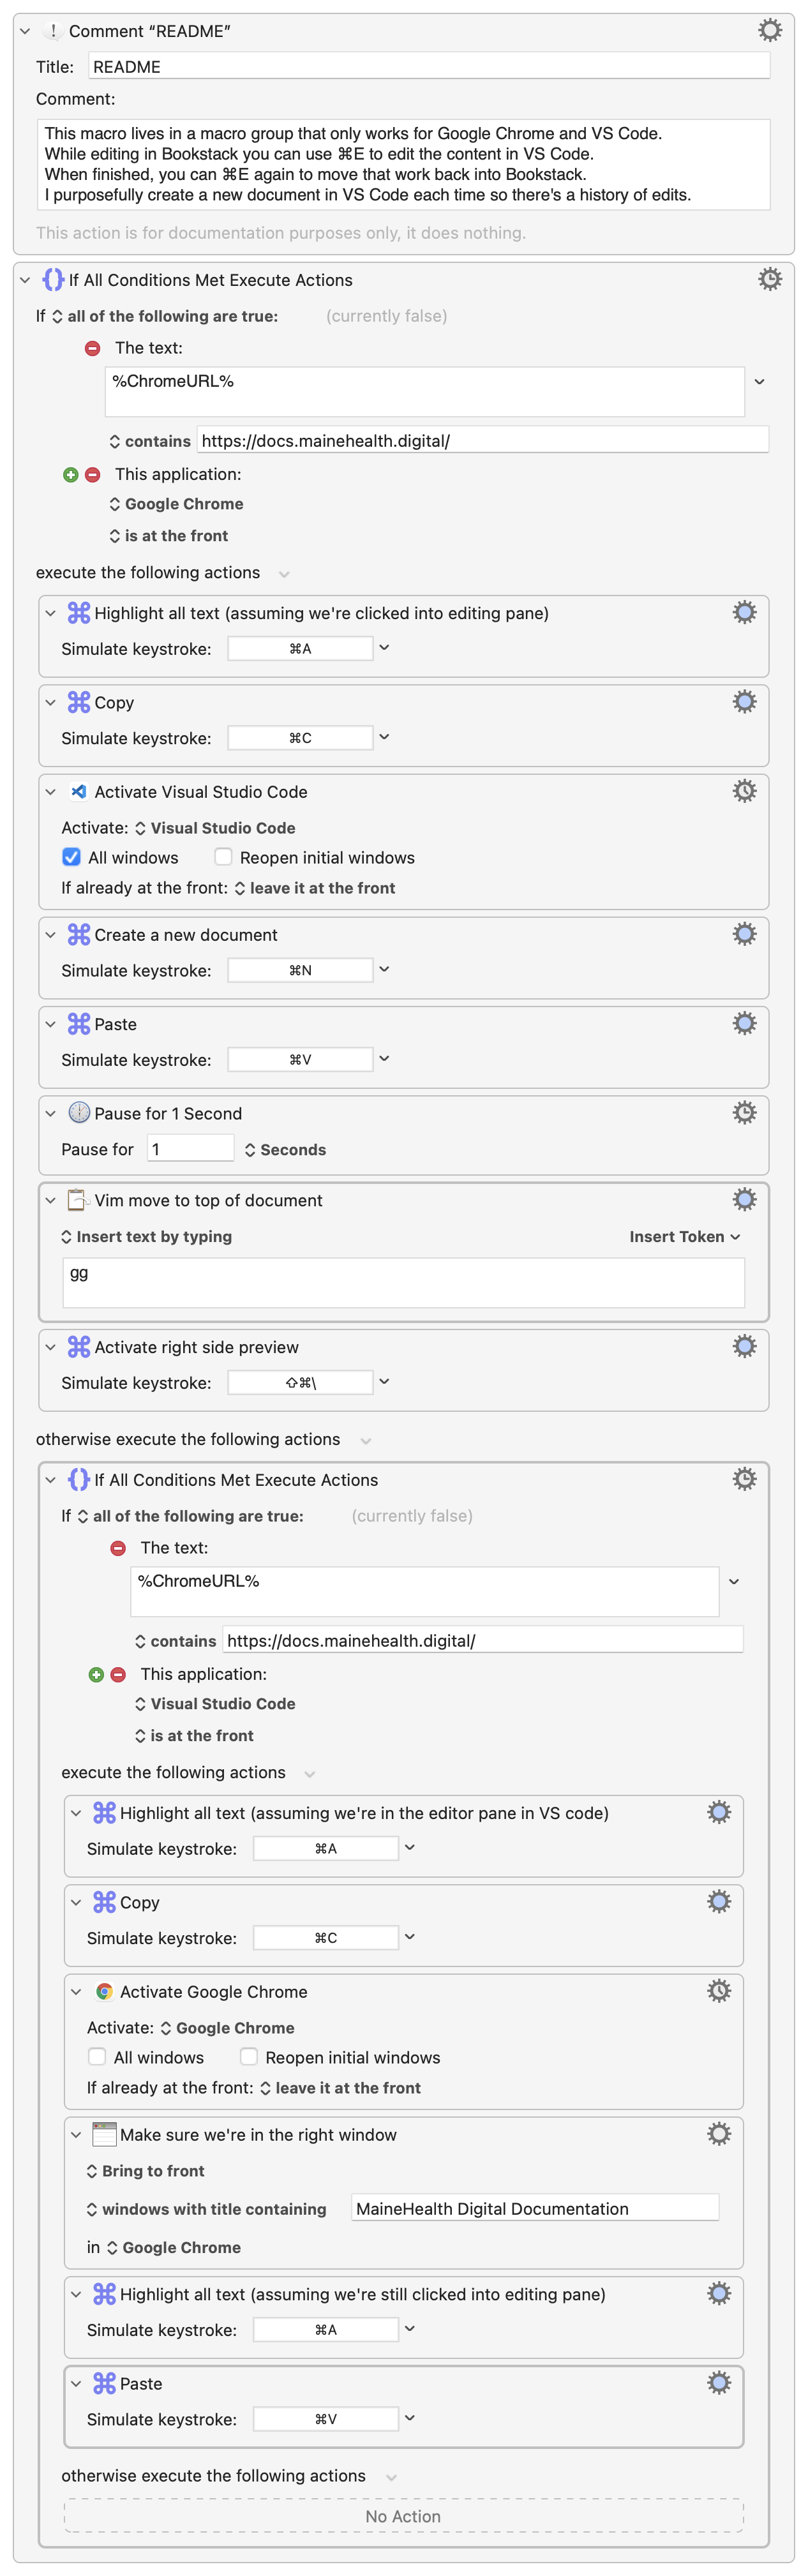
Here’s what I came up with. As with most things, I am sure I’ll tweak this over time to make it better, faster, less “error”-prone, etc. I have added a README comment and renamed most actions so it’s (hopefully) easy to understand the approach.
-
One-handed Gmail Inbox Culling with Keyboard Maestro
Keyboard Maestro proves, once again, why it’s at the top spot on my most recommended Mac applications list.
My normal procedure for culling (deleting unwanted) emails in Gmail is (with list on left and email preview on right):
- Open the first email (opens in right pane)
- If deleting, press “#” (⇧3)
- Else, if skipping, press “j” to move down to the next email (standard Gmail behavior, I think; and it’s intuitive if you’re used to Vim)
- Repeat steps 2 and 3.
I realized today how much I dislike hitting “#” with my left hand while browsing with my right.
-
PERT Estimates – Using Three-Point Estimation to Improve Accuracy
Background & Method
I’ve long been a promoter of using three-point estimates for improved accuracy when estimating tasks.
When I estimate how long a task will take to execute, I imagine three separate circumstances in an effort to improve the accuracy of my estimate:
- Optimistic: How quickly could I get this task done if everything went perfectly. What if I realize some unexpected “wins” that get me to the finish line faster?
- Realistic: When I think about my performance executing similar tasks in the past, what’s my best guess at an average amount of time needed?
- Pessimistic: Sometimes nothing seems to go well. If things do not come together as expected, what’s the longest (within reason) you can imagine this task taking?
If I’ve truly thought about each of these, I can use them as variables in a simple formula, and can get a more accurate time estimate as a result.
This formula, (Best+(Real*2)+(Worst*3))/6 , puts more emphasis on the worst-case scenario (#3 above) as things seem to always take longer than expected to execute. Sometimes I use two versions of the formula (one that puts even more emphasis on pessimistic).
One more thing worth noting: You’ll see I used “I” and “my” a lot above; I do not recommend estimating tasks you are not executing, personally. I recommend having the responsible party estimate the task whenever possible. Explain the PERT process to them.
Usage
While this formula is simple, and adjustable (alter the weights as you see fit), it would take some time to manually calculate the result for each task.
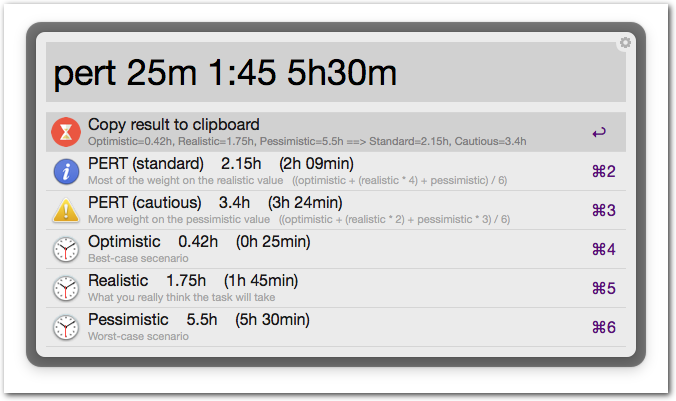
I utilize a few tools to generate PERT estimates at the speed of thought.
First, I’ve written an Alfred plugin to make the process simple. This is my most used method of generating PERT estimates. Here’s a screenshot to give you a taste:
I’ve also created many spreadsheets over the years. These often look similar to this:

-
Monitoring APFS Drive Decryption Progress
I recently decided to [permanently] decrypt an APFS volume via Finder (Right click the drive, choose Decrypt).
There wasn’t any indication that it was actually working. After some web searches, I pieced together a one-liner to monitor the progress of the decryption operation. This will refresh every 60 seconds. If your setup is anything like mine this will be an exceptionally slow operation.
1watch -n 60 "diskutil apfs list | grep 'Decryption Progress'" -
Switch Audio Input/Output Device using Alfred
My top two must-have Mac apps are Keyboard Maestro and Alfred. If you know me, you’ve likely heard me say this, ad nauseum. I use these two apps countless times each day. Often I use them to run command line scripts via hotkey. This is one such implementation.
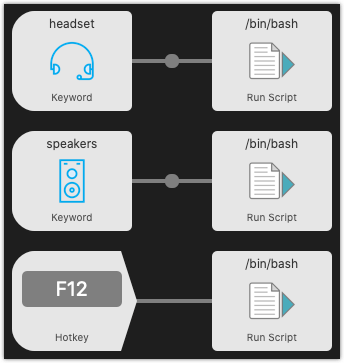
Recently I picked up a Jabra Evolve 65 headset. I keep it connected to my Mac via USB. Also, I have some speakers hooked up via the external speaker jack. You can only send output to one of these devices at a time (speakers OR headset). I desired a way to quick-switch between the two. I chose to use Alfred for this.
The steps below show how to create some quick switchers like this:

Requirements and Initial Setup
-
Automatically Put Files Into a YYYY/MM Directory Structure
123456789101112131415161718192021222324252627#!/usr/bin/env bash## This script will find .sql and .gz files in the current## directory and move them into YYYY/MM directories (created## automatically).BASE_DIR=$(pwd)## Find all .sql and .gz files in the current directoryfind "$BASE_DIR" -maxdepth 1 -type f -name "*.sql" -o -name "*.gz" |while IFS= read -r file; do## Get the file's modification yearyear=$(date -d "$(stat -c %y $file)" +%Y)## Get the file's modification monthmonth=$(date -d "$(stat -c %y $file)" +%m)## Create the YYYY/MM directories if they don't exist. The -p flag## makes 'mkdir' create the parent directories as needed so## you don't need to create $year explicitly.[[ ! -d "$BASE_DIR/$year/$month" ]] && mkdir -p "$BASE_DIR/$year/$month";## Move the filemv "$file" "$BASE_DIR/$year/$month"echo "$file" "$BASE_DIR/$year/$month"done -
Using PHPStorm for Git Diff and Merge tools (Mac)
You love git-difftool, right? Of course! You also love PHP Storm, right? Of course! This easy procedure lets you use PHP Storm as your git-difftool.
- Open a project in PHP Storm
- Click Tools » Create Command-line Launcher…
- Edit your ~/.gitconfig file:
-
12345678910[diff]tool = pstorm[difftool]prompt = false[difftool.pstorm]cmd = /usr/local/bin/pstorm diff "$LOCAL" "$REMOTE"[merge]tool = pstorm[mergetool.pstorm]cmd = /usr/local/bin/pstorm merge "$LOCAL" "$REMOTE" "$BASE" "$MERGED"
-
- Open the project in PHP Storm (see notes below)
- Open iTerm2 (or any other terminal emulator)
- Use
git difftoolas you normally would (e.g.,git difftool .htaccess)
Observations
- If you don’t have PHPStorm open when you try to use
git difftoolit doesn’t seem to work. I need to see if I can get it to open non PHP Storm projects, and/or I need to figure out how to switch on-the-fly between vimdiff and PHP Storm as my difftool. - If you have PHP Storm open but the project itself isn’t open, “Annotate” is not available on right-click. Other functionality may be missing too. If you project is already open in PHP Storm you can annotate the diff!
Thank you to JohnAlbin for the configuration snippet above.
-
Find and Open (in vim) Multiple Files
This is a quick set of examples for finding and opening multiple files in Vim.
1234567891011121314# Open all found files in vimdifffind . -name '.lando.yml' -exec vimdiff {} +# Open all found files, one-by-onefind . -name '.lando.yml' -exec vim {} \;# Open all found files in tabsfind . -name '.lando.yml' -exec vim -p {} +# Open all found files in vertical splitsfind . -name '.lando.yml' -exec vim -O {} +# Open all found files in horizontal splitsfind . -name '.lando.yml' -exec vim -o {} +