-
Wooshy + Keyboard Maestro = Incredible Power
UPDATE: I have a more reliable way of doing this with Applescript + KM. I will post someday when I have time.
I don’t have time to write a full post, but this is too good to not share quickly.
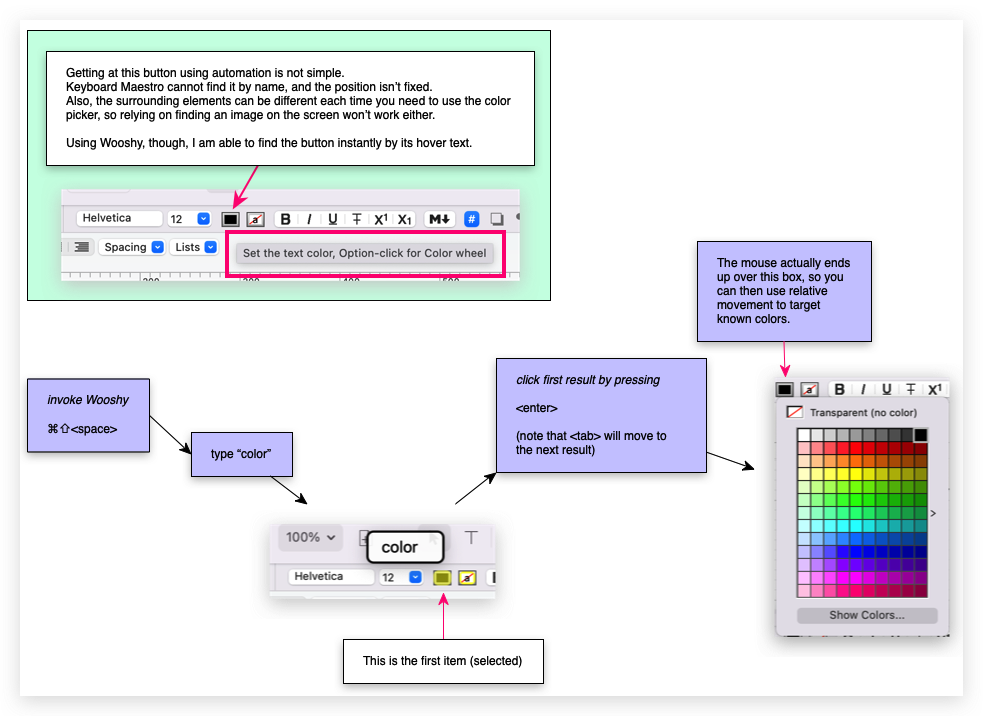
Wooshy lets you find+click elements on the screen by their hover text (in addition to many other features). This means you can target buttons that would be hard to target, like a color picker box (see below).
Keyboard Maestro lets you programmatically invoke/use Wooshy.
Using both, you can target virtually anything on the screen with a high degree of accuracy.
Here’s a visual example. Note that the steps in purple are easily be automated with Keyboard Maestro. Also it’s worth noting you can target all of the text on the hover text for even more accuracy (so I’d have KM search for “Set the text color, Option-click for Color wheel” in the example below. Each keystroke takes more time, so it may not be worth it.
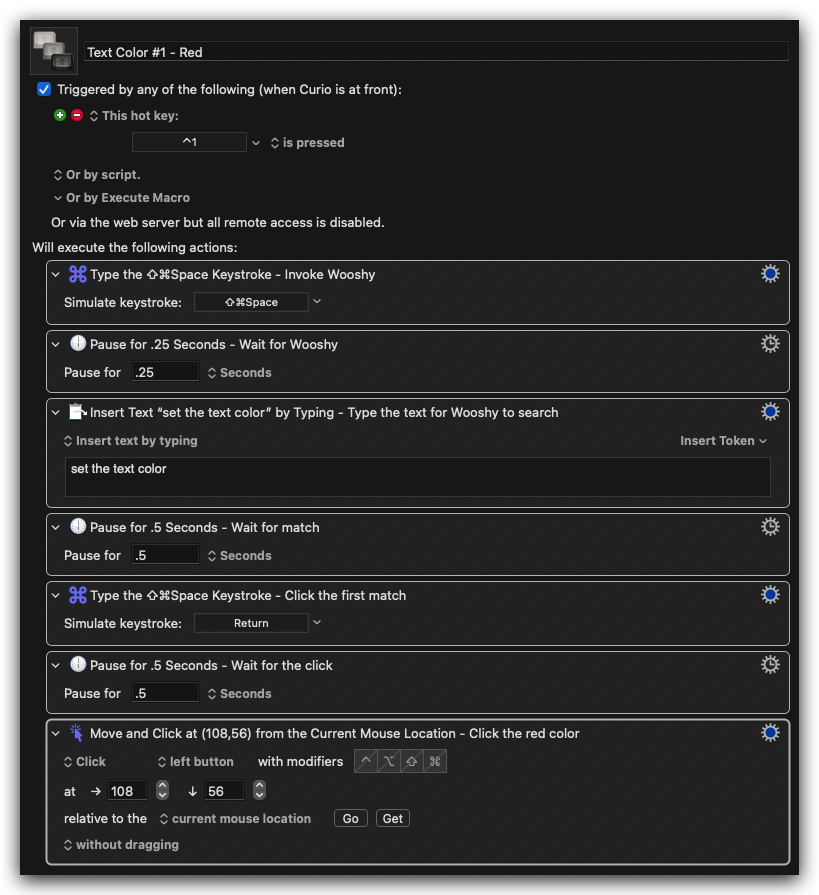
The following KM macro doesn’t have any safety checks (and I really hate using Pause), but it does illustrate the potential:
-
Using Dataview with Charts in Obsidian
Obsidian is my third most used application after Keyboard Maestro and Alfred. I’ve been using the dataview plugin since I got started with Obsidian. It’s an incredible plugin that gives you the ability to treat your notes like database records. In this example I’ll show how I use dataview to make my projects queryable, and then how I use Obsidian-Charts to make some bar charts of this data.
Using Dataview Variables
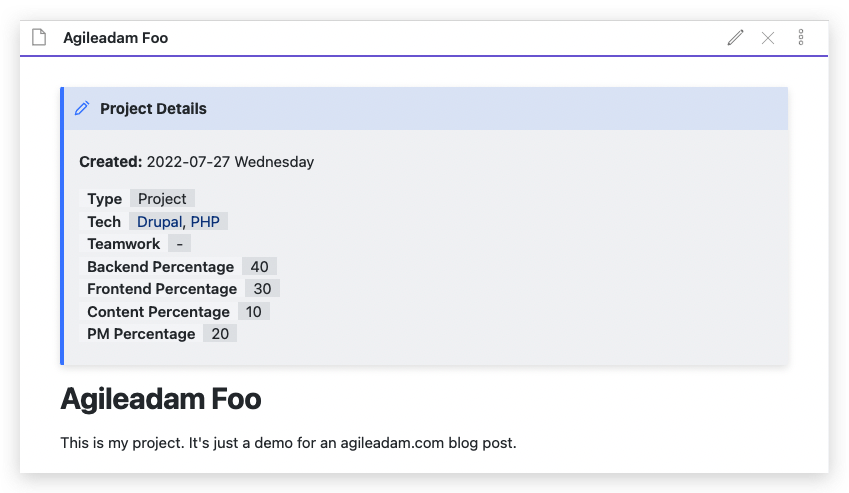
Here’s an example of a Project file in my Obsidian vault:
-
Obsidian Daily Note Implementation v2
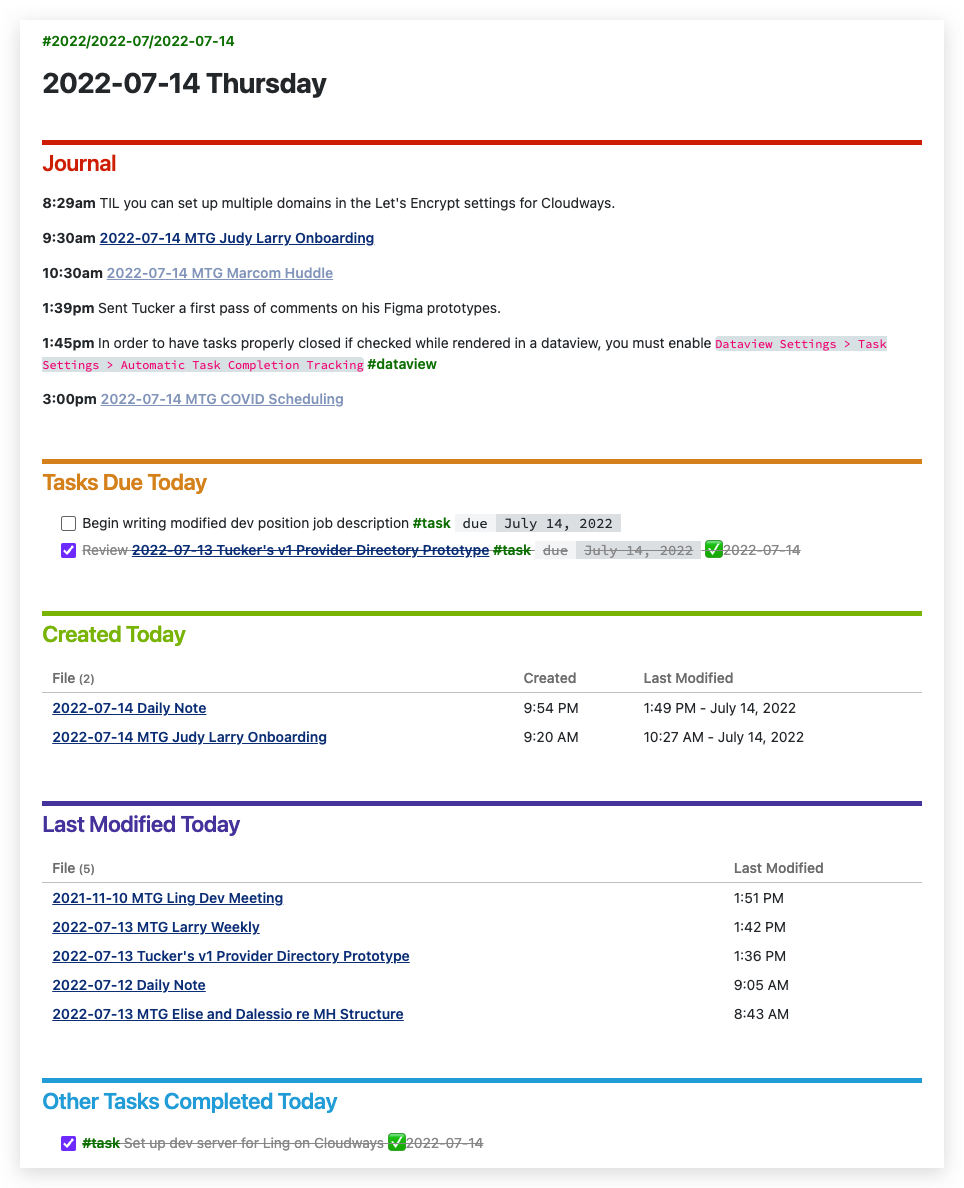
Here’s what my current Obsidian Daily Note looks like:
I’m pleased with this, having come from a pretty bland Daily Note setup prior to this. I’ll explain the setup:
Requirements
- Obsidian
- Daily Notes plugin
- Dataview plugin
- Tasks plugin
- Quick Add plugin (optional, I suppose)
As of July 15, 2022 this only works as expected if you edit in regular source mode, not live preview mode (the live preview won’t show the styling; see https://www.reddit.com/r/ObsidianMD/comments/vz2mw5/comment/ig9g0k9)
Template File
I set up the “Daily notes” plugin as follows:
-
Clipboard Manipulation using Keyboard Maestro
Keyboard Maestro has many triggers; these are responsible for executing macros. One such trigger is “The System Clipboard Changes“. I don’t use it often, despite how incredibly useful it is. It does exactly what it says: if a macro uses this trigger, Keyboard Maestro will execute the macro any time the clipboard content changes (when you “copy” something).
Here’s a quick example showing the usefulness.
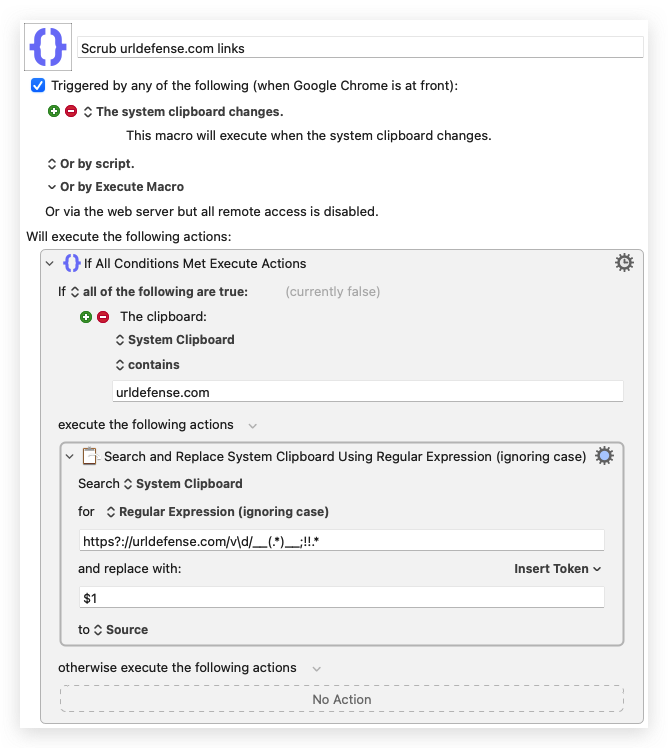
There is a specific issue I have with Microsoft Outlook webmail within Google Chrome. Our email system leverages urldefense.com to alter all external links in the interface (see below). If I’m clicking a link, that’s fine, but if I want to copy a link’s URL it’s annoying to have to clean up the URL to remove the urldefense cruft.
12BEFORE: https://urldefense.com/v3/__https://someurl.com__;!!LQXXzXo!wt7t_lSnYAFTER: xxxxxxxxxxxxxxxxxxxxxxxxxxxx xxxxxxxxxxxxxxxxxxxxxxEverything I’ve marked with an “x” is added by urldefense.
The macro is simple. I leverage The System Clipboard Changes trigger to trigger the macro. The macro is inside of a macro group that is only activated for Google Chrome. I use an If Then Else action to determine if the URL is a target for manipulation. Finally, I use a Search and Replace action with some regular expressions to strip off the urldefense cruft.
-
Using Keyboard Maestro to Set a Window Size for Recording
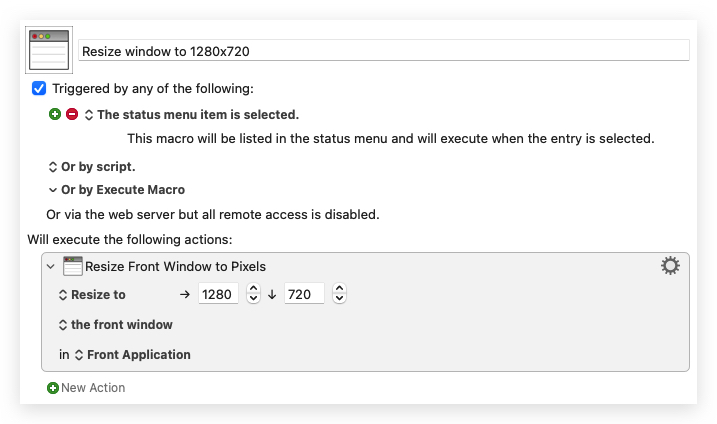
This is a quick one, folks. This simple KM macro sets the front (active) window to a specific size. I use it to prepare a window for screen recording.
Text of Macro:
Resize window to 1280×720
Triggered by any of the following:
- The Status Menu is selected
Will execute the following actions:
- Resize Front Window to Pixels
- To: 1280 horizontally, 720 vertically.
- Notify on failure.
-
Correcting Date Tags using sed in an Entire Obsidian Vault
I’ve been using Obsidian for about 8 months. It wasn’t until today that I realized I’ve been using hierarchical tags incorrectly since day one!
The Problem
In my templater templates I was using the following:
1#<% tp.date.now("YYYY-MM-DD") %>/<% tp.date.now("YYYY-MM") %>/<% tp.date.now("YYYY") %> #<% tp.date.now("YYYY-MM-DD") %>The result of this is:
1#2022-03-17/2022-03/2022 #2022-03-17Unfortunately there are two problems with this. First, there is no need for that extra tag at the end; it’s already covered by the first combo tag.
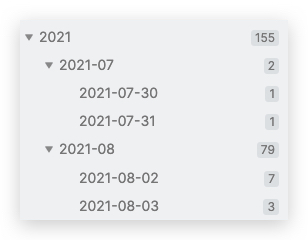
Second, the hierarchy is backwards! This leads to:
123456├── 2022-03-16│ └── 2022-03│ └── 2022└── 2022-03-17└── 2022-03└── 2022Houston, we have a problem! What I really was after was a tag structure like this:
1234└── 2022└── 2022-03├── 2022-03-16└── 2022-03-17The Fix
Thankfully, Obsidian stores all of the files on the filesystem natively, which means you can manipulate them using whatever tools you’d like.
Enter sed, a stream editor. Using sed and find, I was able to quickly resolve both of the issues above.
If I’d taken a little more time I would have handled both problems in one shot, but I did not. I fixed problem 2, then problem 1.
First, I cd’d into the root directory of my vault. Then…
1234567891011# Find markdown files, feed them to sed,# edit the file "in place" (modify them directly)# We use capture groups (the parentheses) to# essentially reverse the order of the tagsfind . -type f -name '*.md' -print0 | xargs -0 sed -E -i "" "s/#([0-9]{4}-[0-9]{2}-[0-9]{2})\/([0-9]{4}-[0-9]{2})\/([0-9]{4})/#\3\/\2\/\1/g"# Find #YYYY/YYYY-MM/YYYY-MM-DD #YYYY-MM-DD,# capturing the first tag to "\1"# Replace with the capture group (thereby dropping the second tag)find . -type f -name '*.md' -print0 | xargs -0 sed -E -i "" "s/(#[0-9]{4}\/[0-9]{4}-[0-9]{2}\/[0-9]{4}-[0-9]{2}-[0-9]{2}) #[0-9]{4}-[0-9]{2}-[0-9]{2}/\1/g"Finally, I updated all of my templater templates to drop the second tag and fix the first to be in the right order.
Obsidian picked up all of the changes immediately, which were reflected in the tag pane. Much cleaner!
-
Editing a DEVONThink Markdown File in VS Code
This is a sister post to Editing Web Content in VS Code.
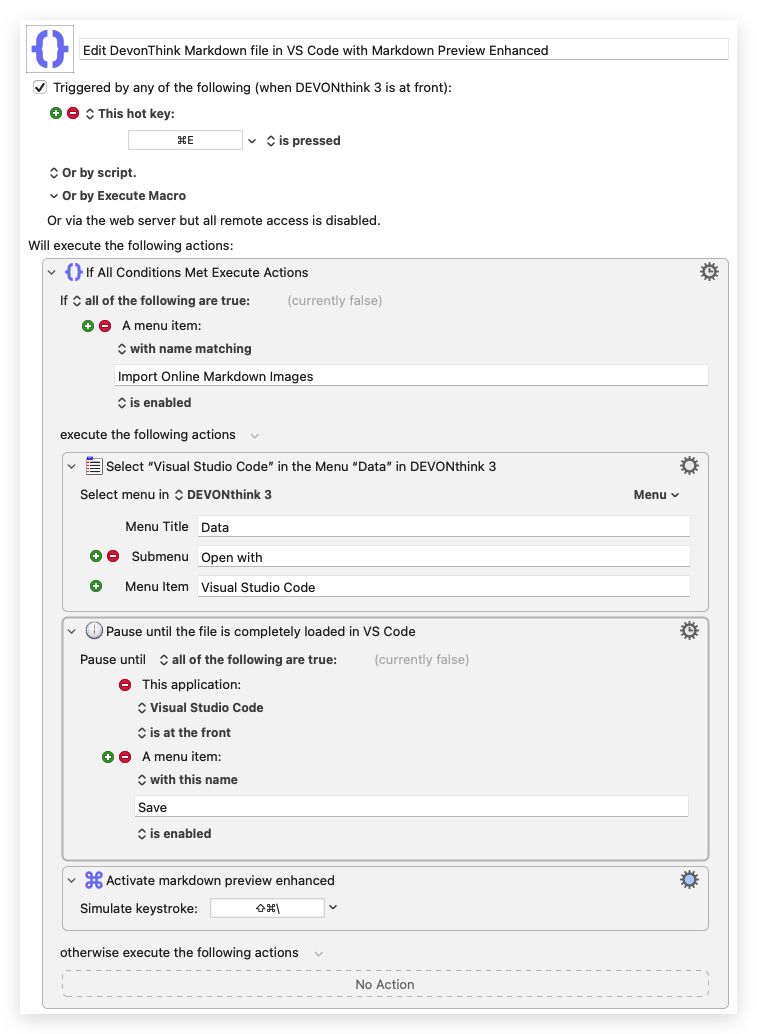
This simple macro opens the current file (if Markdown) in VS Code, with the Markdown Preview Enhanced pane open on the right automatically.
-
Editing Web Content in VS Code
Okay, so it’s not quite as amazing as the title suggests, but this solution is worth sharing.
I work a lot in Bookstack. It’s a fantastic documentation system built with Laravel. I edit all pages in markdown. There is a markdown pane on the left and a preview on the right. I love the UI (shown below) but unfortunately I cannot move around in the editor like I can in PHPStorm or VS Code, where I have Vim support.
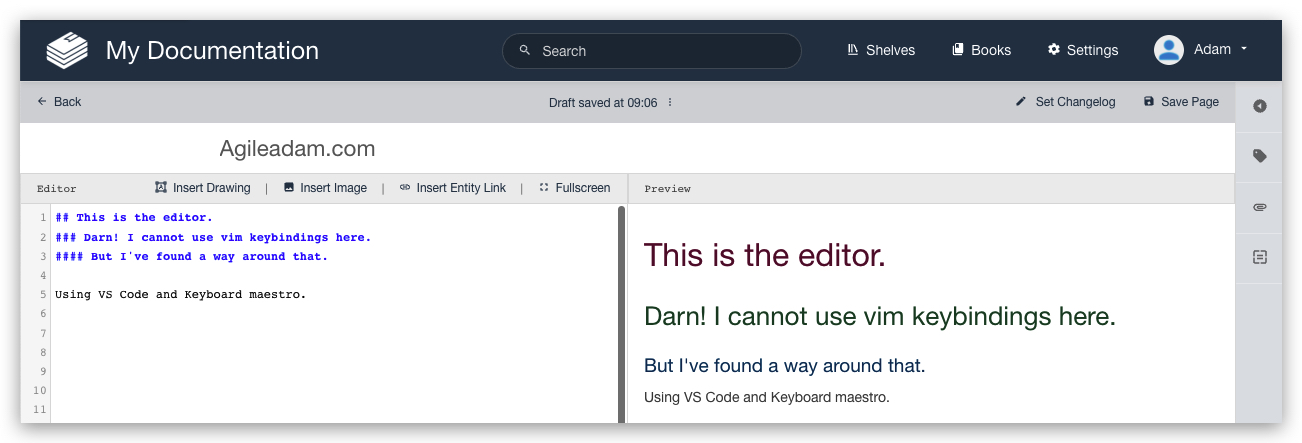
I have a Chrome extension called Wasavi, which is incredible for editing text areas in an inline virtual Vim window. Unfortunately, though, it doesn’t show realtime feedback in the preview pane until I save and close out of the virtual editor.
It occurred to me it’d be useful to just pop into VS Code quickly to edit the doc, then bring those edits back into the Bookstack editor in Chrome. At first I dismissed the idea as being “too much work.” After thinking about it for a moment, though, I realized I could MacGyver this relatively quickly with my favorite Mac application, Keyboard Maestro.
Here’s what I came up with. As with most things, I am sure I’ll tweak this over time to make it better, faster, less “error”-prone, etc. I have added a README comment and renamed most actions so it’s (hopefully) easy to understand the approach.
-
One-handed Gmail Inbox Culling with Keyboard Maestro
Keyboard Maestro proves, once again, why it’s at the top spot on my most recommended Mac applications list.
My normal procedure for culling (deleting unwanted) emails in Gmail is (with list on left and email preview on right):
- Open the first email (opens in right pane)
- If deleting, press “#” (⇧3)
- Else, if skipping, press “j” to move down to the next email (standard Gmail behavior, I think; and it’s intuitive if you’re used to Vim)
- Repeat steps 2 and 3.
I realized today how much I dislike hitting “#” with my left hand while browsing with my right.
-
Testing Cookie Modification in Laravel 8
If there’s a better way to pass a cookie from one request to another, in a phpunit feature test in Laravel, please let me know! Here’s one way to handle it:
12345678910111213141516171819202122232425262728293031323334353637383940414243444546<?phpnamespace Tests\Feature;use Illuminate\Cookie\CookieValuePrefix;use Tests\TestCase;class DiveDeeperTest extends TestCase{/*** Tests if the diveDeeper route appends the passed value to the cookie arr.* @return void*/public function test_it_updates_path_cookie(){// Post a deeperPath to the diveDeeper route (with a starter cookie).// This should append the "deeperPath" value to the "path" cookie array.$resp = $this->withCookie('path', serialize(['/']))->post(route('diveDeeper'), ['deeperPath' => 'Users']);// Assert that the cookie has been modified.$resp->assertCookie('path', serialize(['/', 'Users']));// If we make another post request here, it won't include our// modified "path" cookie. We have to retrieve it, then pass it// through to the next request.// Decrypt the cookie (now modified by the diveDeeper route).$cookieValue = CookieValuePrefix::remove(app('encrypter')->decrypt($resp->getCookie('path')->getValue(), false));// Hit the diveDeeper route again using the modified cookie value.$resp = $this->withCookie('path', $cookieValue)->post(route('diveDeeper'), ['deeperPath' => 'adam']);// Assert that the cookie has been modified again.$resp->assertCookie('path', serialize(['/', 'Users', 'adam']));// Etc...}}

