-
Editing Web Content in VS Code
Okay, so it’s not quite as amazing as the title suggests, but this solution is worth sharing.
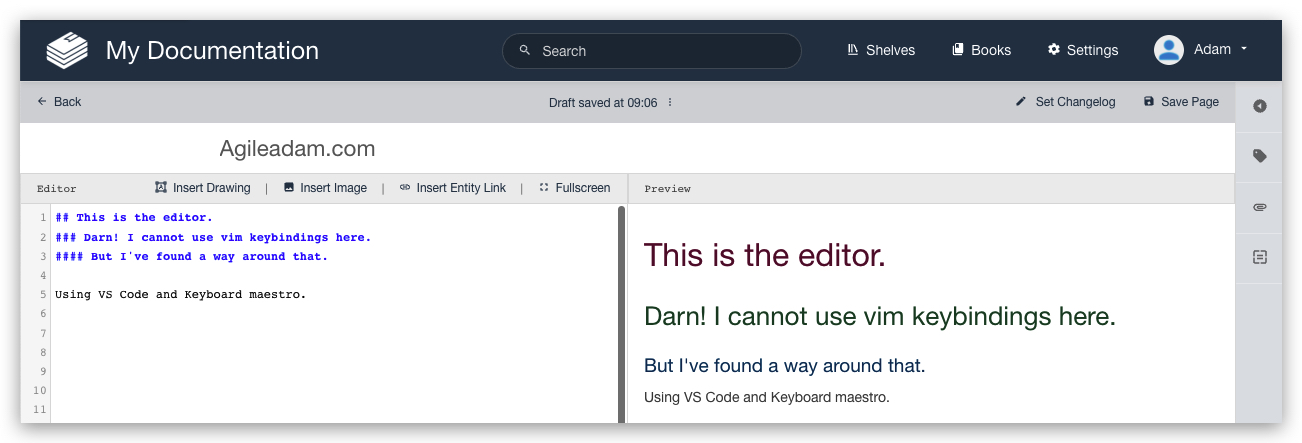
I work a lot in Bookstack. It’s a fantastic documentation system built with Laravel. I edit all pages in markdown. There is a markdown pane on the left and a preview on the right. I love the UI (shown below) but unfortunately I cannot move around in the editor like I can in PHPStorm or VS Code, where I have Vim support.
I have a Chrome extension called Wasavi, which is incredible for editing text areas in an inline virtual Vim window. Unfortunately, though, it doesn’t show realtime feedback in the preview pane until I save and close out of the virtual editor.
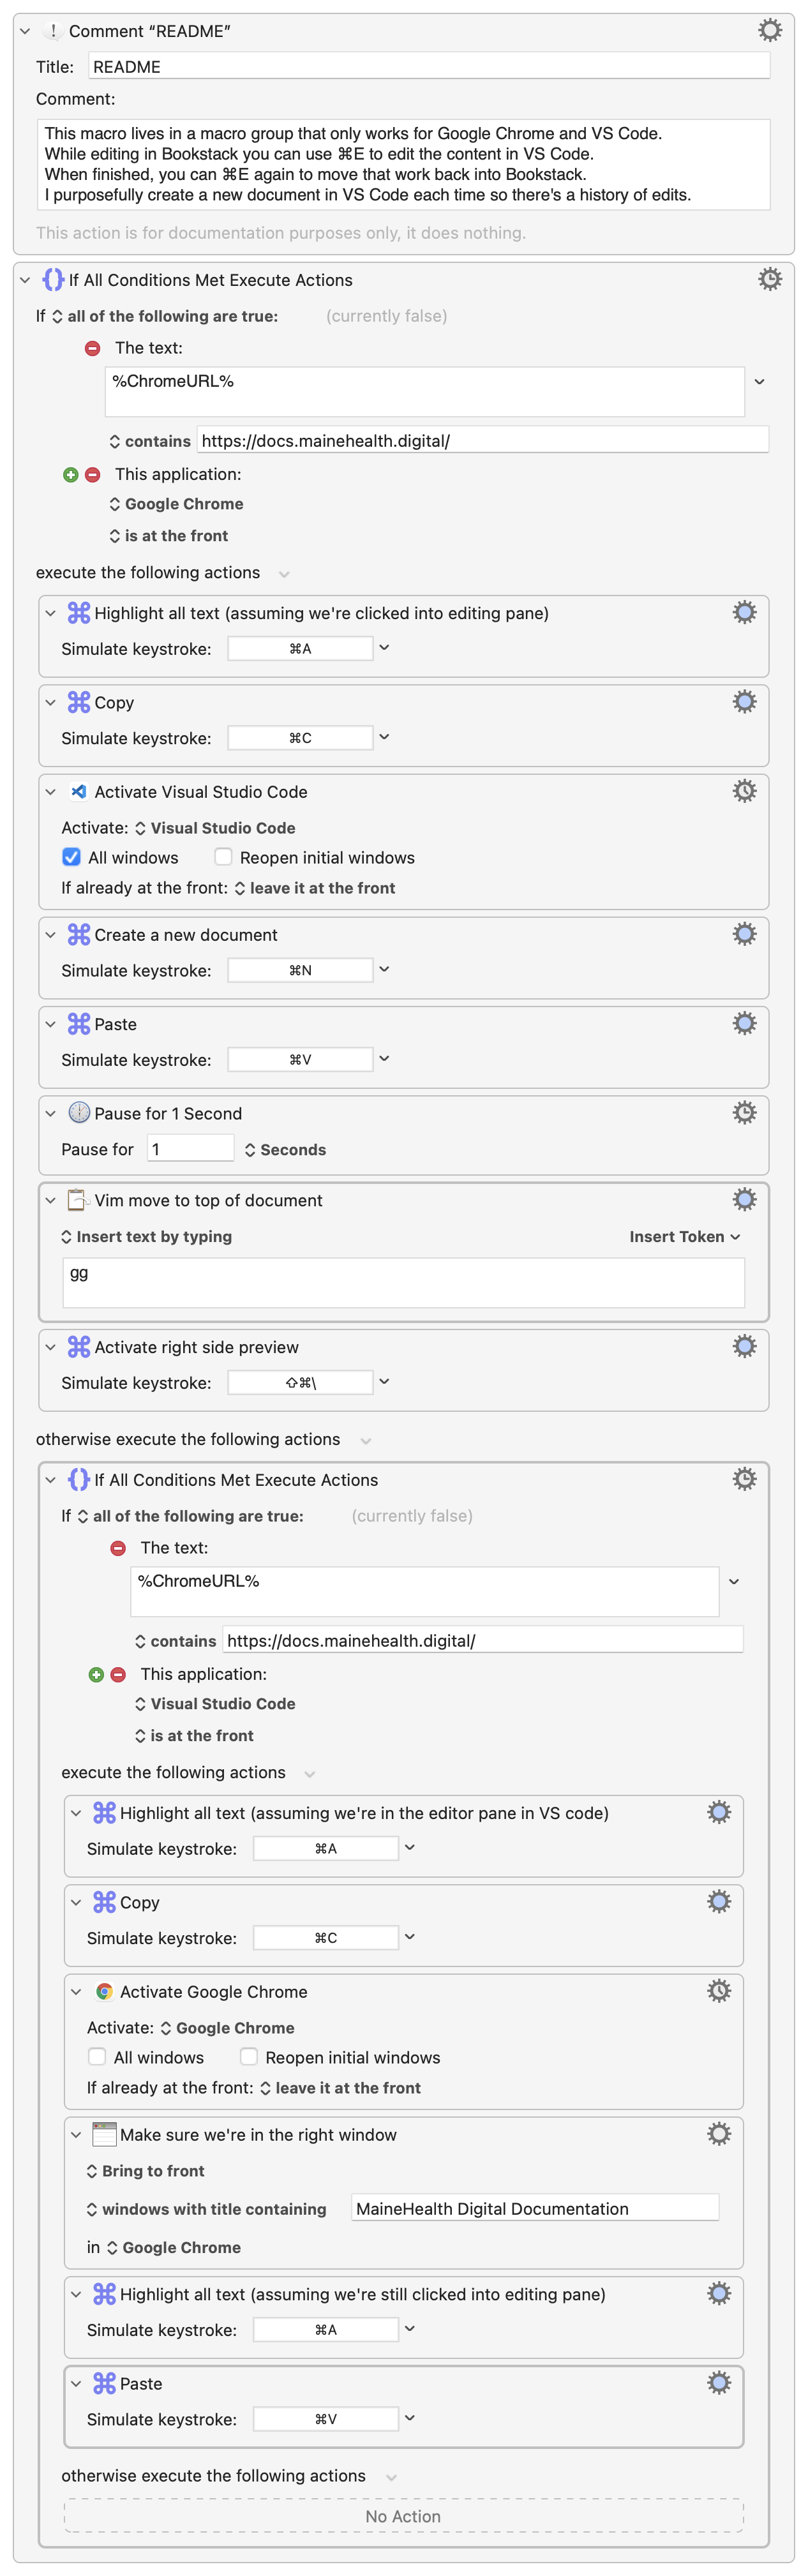
It occurred to me it’d be useful to just pop into VS Code quickly to edit the doc, then bring those edits back into the Bookstack editor in Chrome. At first I dismissed the idea as being “too much work.” After thinking about it for a moment, though, I realized I could MacGyver this relatively quickly with my favorite Mac application, Keyboard Maestro.
Here’s what I came up with. As with most things, I am sure I’ll tweak this over time to make it better, faster, less “error”-prone, etc. I have added a README comment and renamed most actions so it’s (hopefully) easy to understand the approach.
-
Using “php artisan serve” with xdebug and PHPStorm
This is more of a person note for myself. This posts assumes some knowledge of php, Laravel, artisan, Homebrew, and xdebug.
I’ve been using php artisan serve to serve Laravel applications locally. It’s quick and it works well.
It’s probably not a great solution if you’re working with other people on a project, or if you want to implement a good CD/CI workflow. Having said that, it’s what I’m using today, so I figured I’d document how I got xdebug working with it (on my Mac).
-
Remote PHP Debugging with Xdebug + PHPStorm or VSCode on Cloudways
Here’s a quick breakdown of the steps required to debug a PHP site on a remote Cloudways server.
Step 1:
Enable xdebug for the whole Cloudways server:
Server » Settings & Packages » Advanced » XDEBUG: Enabled
Step 2:
For the specific application in Cloudways, add some PHP settings:
Application » Application Settings » PHP FPM Settings:
123php_value[xdebug.mode] = debugphp_value[xdebug.start_with_request] = yesphp_value[xdebug.remote_connect_back] = 1Step 3: Setup SSH config for an ssh tunnel to the server:
- Edit
~/.ssh/config
1234Host mhd1_xdebugHostName 44.33.222.111User master_acevddddddRemoteForward 9003 localhost:9003Step 4 (PHPStorm):
Configure PHPStorm Preferences
- PHP » Debug » Xdebug » Debug port = 9003
- PHP » Debug » Xdebug — Check all four boxes:
- Can accept external connections
- Resolve breakpoint if it’s not available on the current line
- Force break at first line when no path mapping specified
- Force break at first line when a script is outside the project
- You shouldn’t need to configure servers, PHP cli, deployment locations, or anything similar…
Try It
- Start an SSH tunnel:
ssh mhd1_xdebug - Drop a breakpoint in index.php (or whatever will surely execute)
- Visit the site, then wait for PHPStorm to prompt you for which file to connect to. Choose accordingly. It should connect and pause. You only have to do this once; it’ll remember the settings and path mapping in PHP » Servers.
Step 4 (VSCode)
Configure VSCode Preferences
- Install https://marketplace.visualstudio.com/items?itemName=felixfbecker.php-debug
- Click the Run and Debug sidebar icon (⌘⇧D)
- SSH into the server to find the exact path to the root of the site (which should match the root of your repo locally, your workspace folder)
- Add new configuration (you can disable the log option if things work well right away)
123456789101112131415{"version": "0.2.0","configurations": [{"name": "Listen for Xdebug","type": "php","request": "launch","port": 9003,"pathMappings": {"/home/511111.cloudwaysapps.com/crwysaaaaa/public_html": "${workspaceFolder}",},"log": true},]}Try it
- Start an SSH tunnel:
ssh mhd1_xdebug - Click Listen for Xdebug in the Run and Debug screen
- Drop a breakpoint in index.php (or whatever will surely execute)
- Visit the site
- Edit
-
Using PHPStorm for Git Diff and Merge tools (Mac)
You love git-difftool, right? Of course! You also love PHP Storm, right? Of course! This easy procedure lets you use PHP Storm as your git-difftool.
- Open a project in PHP Storm
- Click Tools » Create Command-line Launcher…
- Edit your ~/.gitconfig file:
-
12345678910[diff]tool = pstorm[difftool]prompt = false[difftool.pstorm]cmd = /usr/local/bin/pstorm diff "$LOCAL" "$REMOTE"[merge]tool = pstorm[mergetool.pstorm]cmd = /usr/local/bin/pstorm merge "$LOCAL" "$REMOTE" "$BASE" "$MERGED"
-
- Open the project in PHP Storm (see notes below)
- Open iTerm2 (or any other terminal emulator)
- Use
git difftoolas you normally would (e.g.,git difftool .htaccess)
Observations
- If you don’t have PHPStorm open when you try to use
git difftoolit doesn’t seem to work. I need to see if I can get it to open non PHP Storm projects, and/or I need to figure out how to switch on-the-fly between vimdiff and PHP Storm as my difftool. - If you have PHP Storm open but the project itself isn’t open, “Annotate” is not available on right-click. Other functionality may be missing too. If you project is already open in PHP Storm you can annotate the diff!
Thank you to JohnAlbin for the configuration snippet above.